Table of Contents
Introduction
Hello everyone!!!

In this post, we will be discussing Docker Swarm creation over AWS. As we all know, Docker is a technology that allows you to build, run, test, and deploy distributed applications that are based on Linux containers. More often, distributed systems are given preferences over standalone production containers. There are various advantages of running multiple containers to ensure reliable scheduling of services and improving CI/CD gaining immutability.
Articles Related to Docker
- How to install Docker on RHEL and CentOS Linux 7
- Search for Docker images and launch a Container
- Connect to Docker containers and expose the Network
- Manage the Docker Containers
Docker Swarm
Docker Swarm came into existence with 1.12 docker release. This release has provided the capability of clustering one or more physical/virtual machines together called a swarm. The swarm comprises of two types of machines called nodes,
- Manager Node: These nodes handle cluster management tasks like maintenance of cluster state, scheduling of services, serving swarm mode HTTP API endpoints. This is managed using a Raft Consensus implementation. As per the docker guide, an N manager cluster tolerates the loss of at most (N-1)/2 managers.
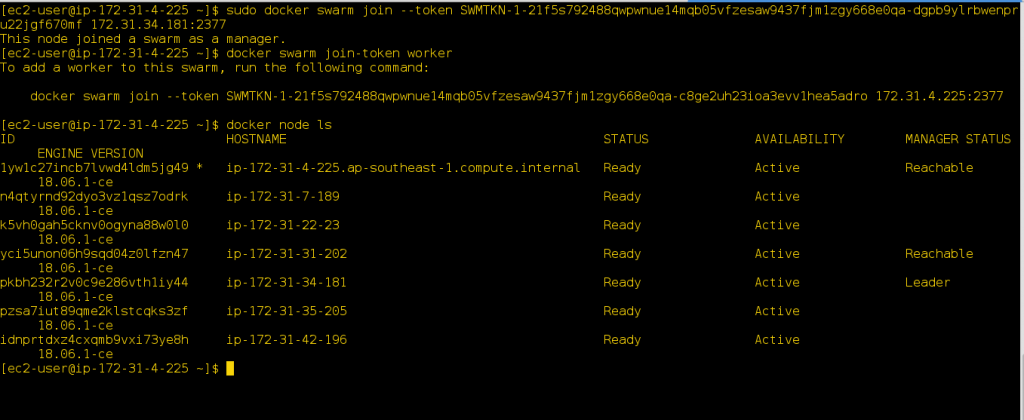
- Worker Node: These nodes are also the VMs/physical machines installed with the Docker Engine. They do not take part in the Raft distributed state for scheduling decisions, etc. Note the point that, we can create a swarm of one manager node, but cannot have a worker node without at least one manager node. By default, all managers are also workers. Here we will be creating 7 workers including 3 manager nodes.
Architecture Setup
In AWS, a few things are already present to set up the docker swarm.
A. Default VPC in any region to provide the network for connected EC2 instances with two or more subnet. In this post, we have used the Singapore region.
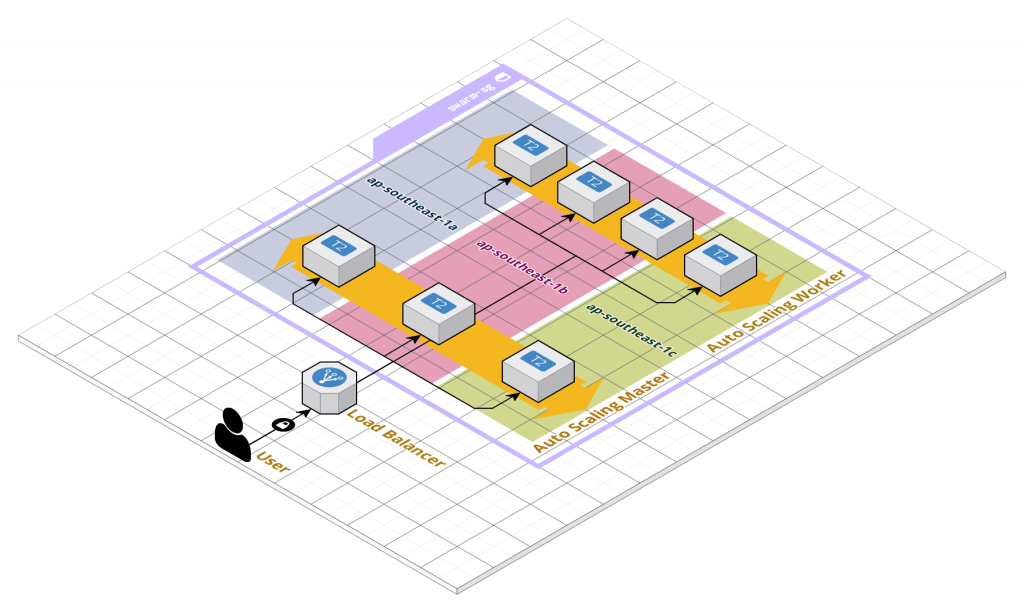
B. AWS EC2 instances (t2.micro) launched with Amazon AMI installed with docker. Two AutoScaling Groups, one for Manager nodes and one for worker nodes, with a common ELB.
C. Add SecurityGroup rules to these instances providing, HTTP port 80 to 0.0.0.0/0 and SSH port 22 to your public IP. Use this to get your IP details.
To design the docker swarm architecture for AWS, I have used cloudcraft because its free to use and I am using it for day to day work. You can go for alternate options like creately and draw.io as per your interest and convenience.


As you can see in the diagram, our architecture comprises of 3 Manager Nodes (in different AZs) and 4 Worker nodes.
Let’s start with the above in AWS Singapore region by creating the AWS EC2 instances. Feel free to take help from AWS Documentation to create EC2 instances in different AZs, configuring security groups and ELBs. Installing Docker in AWS-EC2 instances
Installing Docker in AWS-EC2 instances
Run the following commands on all EC2 instances to install docker:
$ sudo yum update -y
$ sudo yum -y install docker
$ sudo service docker start
$ sudo usermod -a -G docker ec2-user
$ sudo docker info
Add Manager Node
On all the manager nodes, run the command to add to docker swarm,
# sudo docker swarm init --advertise-addr <manager_ip>To add two additional managers to your swarm, run the command,
# sudo docker swarm join --token <manager_token> <manager_ip>:2377Add Worker Nodes
To add worker nodes, get the swarm token from the manager node by running this,
# sudo docker swarm join-token workerAnd add the resulting command along with the token on the worker nodes.
Verify the Docker Swarm Status
To verify the docker swarm status after each node addition, run the command on any manager,
# sudo docker node ls
Create a Simple Nginx Service
To test the docker swarm lets create an Nginx service as
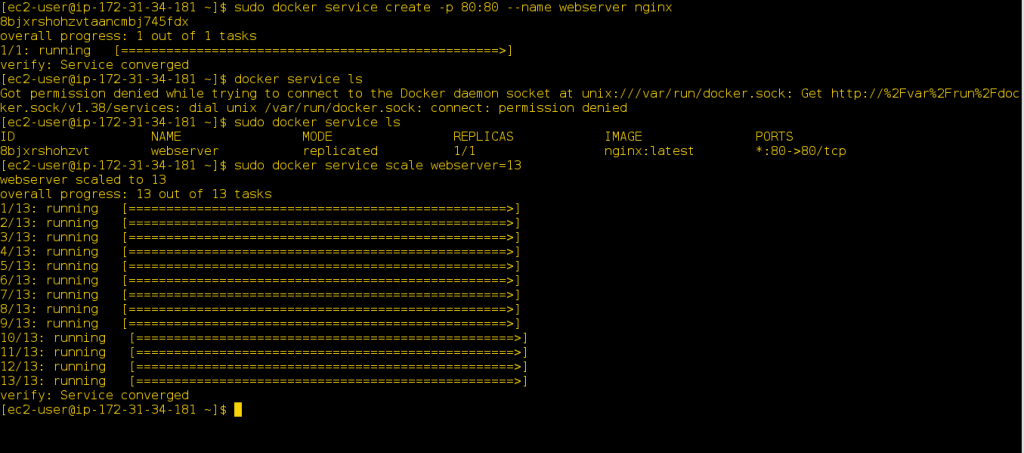
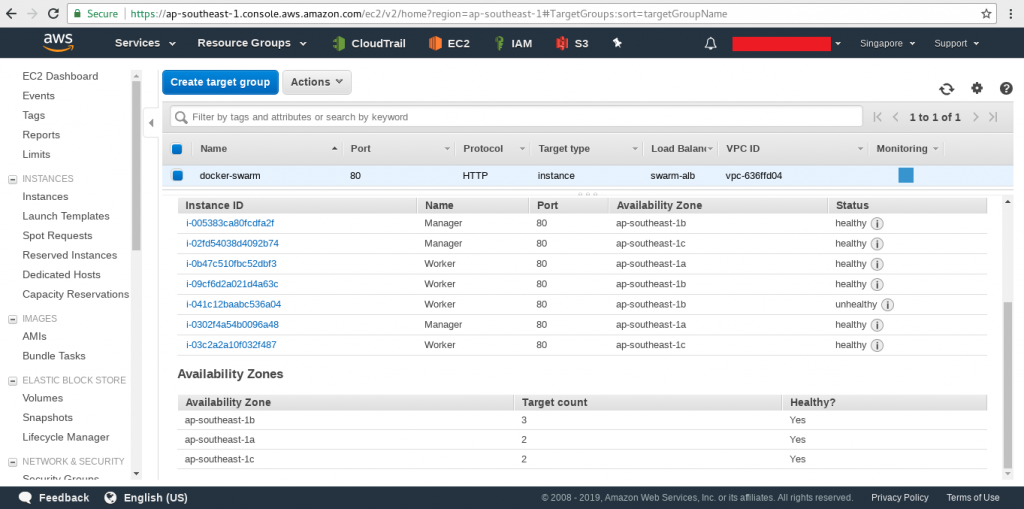
# sudo docker service create -p 80:80 --name webserver nginxAnd check out the ELB status over the manager where you ran the above. It gets changed from unhealthy to healthy as the root location is now filled with Nginx’s default page.
Tweak a lot!!!
If you want to tweak a little bit more, scale this service out,
# sudo docker service scale webserver=13
And check the ELB Targets again, gradually all will appear as healthy and each one redirecting to Nginx default page.

Important Points:
- To create the same docker cluster in AWS using either the UserData/Bootstrap script to run the docker installation commands same for every EC2 instance.
- To configure Manager/Worker on EC2 instances try to use SSM Run Command. As the cluster size increases, it will help to manage it easily.
- In order to configure the Manager/Worker, use the private IPs of the EC2 instances. Public IPs are only defined to access the server. If you can check running “ifconfig” in EC2 instances, you will find out that there is no interface present for public IPs.
- Configure the Security Group (swarm-sg) properly by defining rules for port 2377 (used for connecting internally to docker machines) and ELB security group to accept the traffic.
- In this article, a default VPC is used to demonstrate the Docker Swarm setup, while Custom VPCs are a better way to apply security strategies.
Conclusion
This is how Docker Swarm can be created and managed at a small scale. To manage this over a large scale, some CloudFormation Template writing skills can help out more along with AWS SSM Run command.
In the upcoming posts, we will see what are the docker metrics we can use to analyze the docker containers, how to get the visualization of important metrics using Grafana and Prometheus and a lot about AWS.
https://www.linuxsysadmins.com/wp-content/uploads/2019/04/Docker-Swarm-AWS-1024×607.jpg
seems to be missing
@nobody,
Dear, It’s fixed. Thanks for reporting.