Table of Contents
Introduction
Building a Syslog server with syslog-ng will provide full control with more fine grinned central logging system. It’s licenced under open source with rich filtering capabilities and flexible configuration while comparing to other logging systems. The number of destination and log elements can be created in a syslog-ng configuration file is a maximum of 6665 sources, destination and log element.
In this guide, I have used CentOS 8.3 Linux server as my Centralized Syslog server and other clients will send the logs using port 514 over the UDP protocol.
Later will show how to forward the logs from syslog-ng to another destination. In my case, it will be Splunk server.
This is the setup I have used in my home lab.
+---------------------------------------------------+
| +------+          +----------+       +---------+  |
| |Client| +------> |          |       |         |  |
| +------+          |          |       |         |  |
|                   |          |       |         |  |
| +------+          |Syslog-ng |       |         |  |
| |Client| +------> |  Server  +------>+ Splunk  |  |
| +------+          |          |       | Server  |  |
|                   |          |       |         |  |
| +------+          |          |       |         |  |
| |Client| +------> |          |       |         |  |
| +------+          +----------+       +---------+  |
+---------------------------------------------------+
Enable EPEL Repository
Add the latest EPEL repository by running yum command.
# yum install https://dl.fedoraproject.org/pub/epel/epel-release-latest-8.noarch.rpm
EPEL repo has been installed.
Running transaction
  Preparing        :                                        1/1
  Installing       : epel-release-8-10.el8.noarch           1/1
  Running scriptlet: epel-release-8-10.el8.noarch           1/1
  Verifying        : epel-release-8-10.el8.noarch           1/1

Installed:
  epel-release-8-10.el8.noarch

Complete!
[root@syslogng ~]#
Installing Syslog Server
Install syslog-ng using yum install command. It will manage to install the required dependencies for our Syslog server.
# yum install syslog-ng
Running transaction
  Preparing        :                                        1/1
  Installing       : ivykis-0.42.4-2.el8.x86_64             1/3
  Installing       : libnet-1.1.6-15.el8.x86_64             2/3
  Running scriptlet: libnet-1.1.6-15.el8.x86_64             2/3
  Installing       : syslog-ng-3.23.1-2.el8.x86_64          3/3
  Running scriptlet: syslog-ng-3.23.1-2.el8.x86_64          3/3
  Verifying        : libnet-1.1.6-15.el8.x86_64             1/3
  Verifying        : ivykis-0.42.4-2.el8.x86_64             2/3
  Verifying        : syslog-ng-3.23.1-2.el8.x86_64          3/3

Installed:
  ivykis-0.42.4-2.el8.x86_64
  libnet-1.1.6-15.el8.x86_64
  syslog-ng-3.23.1-2.el8.x86_64

Complete!
[root@syslogng ~]#
Firewall Configuration
The default port we are about to use in this guide is 514 with UDP protocol. Below are the supported ports respective to formatted traffic in syslog-ng.
- 514, both TCP and UDP, for RFC3164 (BSD-Syslog) formatted traffic
- 601 TCP, for RFC5424 (IETF-Syslog), formatted traffic
- 6514 TCP, for TLS-encrypted traffic
The firewall service which we are about to enable will allow the 514/UDP.
[root@syslogng ~]# cat /usr/lib/firewalld/services/syslog.xml
<?xml version="1.0" encoding="utf-8"?>
<service>
  <short>syslog</short>
  <description>Syslog is a client/server protocol: a logging application transmits a text message to the syslog receiver. The receiver is commonly called syslogd, syslog daemon or syslog server.</description>
  <port protocol="udp" port="514"/>
</service>
[root@syslogng ~]#
Run the firewall-cmd command and allow the traffic permanently.
[root@syslogng ~]# firewall-cmd --add-service=syslog --permanent
 success
[root@syslogng ~]#

[root@syslogng ~]# firewall-cmd --reload
 success
[root@syslogng ~]#

[root@syslogng ~]# firewall-cmd --list-all
 public (active)
   target: default
   icmp-block-inversion: no
   interfaces: ens18
   sources:
   services: cockpit dhcpv6-client ssh syslog
   ports:
   protocols:
   masquerade: no
   forward-ports:
   source-ports:
   icmp-blocks:
   rich rules:
[root@syslogng ~]#
By default syslog server will use RFC5424 traffic format so it will use the port number 601. Once we reconfigure the configuration it will listen on port number 514/UDP.
Configuring Syslog-ng
The main configuration for syslog-ng will be under /etc/syslog-ng/
[root@syslogng ~]# ls -lthr /etc/syslog-ng/syslog-ng.conf
 -rw-r--r--. 1 root root 2.3K Jul  2 17:32 /etc/syslog-ng/syslog-ng.conf
[root@syslogng ~]#
To follow a standard and good practice avoid editing the main configuration.
If you need to make changes on main configuration, take a backup before start editing it.
# cp /etc/syslog-ng/syslog-ng.conf /etc/syslog-ng/syslog-ng.conf-original
In our guide, we will follow the best practice by creating a custom config and include inside the main config file.
#Source additional configuration files (.conf extension only)
@include "/etc/syslog-ng/conf.d/*.conf"
Create a new config file under /etc/syslog-ng/conf.d/ make sure to end the file name with .conf
# vim /etc/syslog-ng/conf.d/linuxsysadmins.confDefine Source Driver
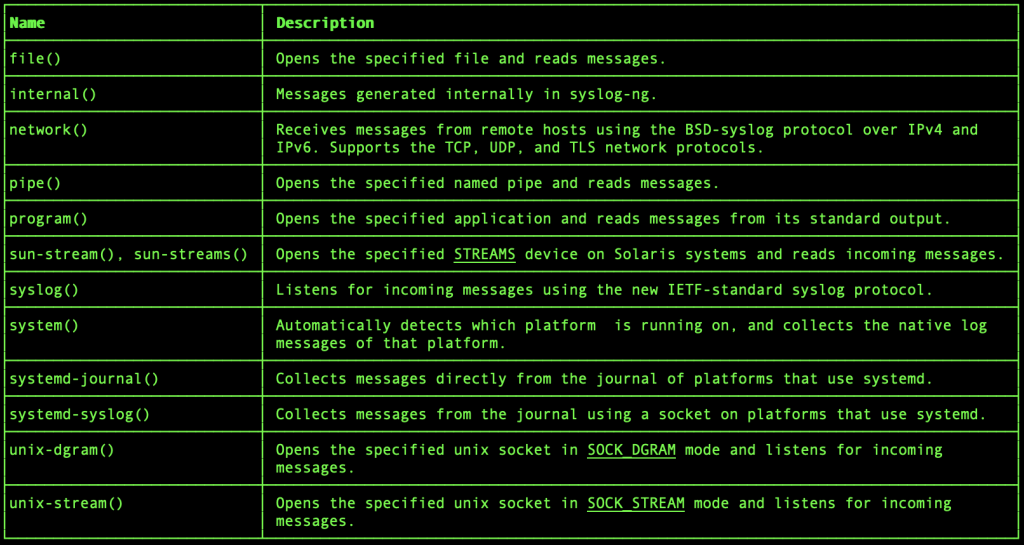
The source is which decide what to log from where? The capability of Syslog-ng is, It supports to log from a local file or from an application and much more. In this guide, we will use the source network. If you need to know more about other sources below are they.

Using Network as source
Define the source, this is where you are going to receive the logs.
source s_network {
    syslog(ip(192.168.0.29) transport("udp"));
};
We are receiving log on an interface configured with the 192.168.0.29 using UDP protocol.
Using local file as source
To use a local file as source, for example we are using audit log.
This may help where hundreds of Linux servers forwarding audit logs to a centralized audit log server.
Note:> While SELinux in enforcing mode, syslog-ng (var_log_t) not allowed to read audit logs, because audit logs are with label (auditd_log_t). To grant read access to syslog-ng on audit logs, we need to have a custom policy (not a good practice).
source s_audit {
    file("/var/log/audit/audit.log");
};
Above are just an example, to forward audit log we have many other ways.
Define Destination Driver
Create local destinations where the logs need to be stored, the default location will be /var/log/messages. As we need to save the files under a file we will use destination driver as the file.
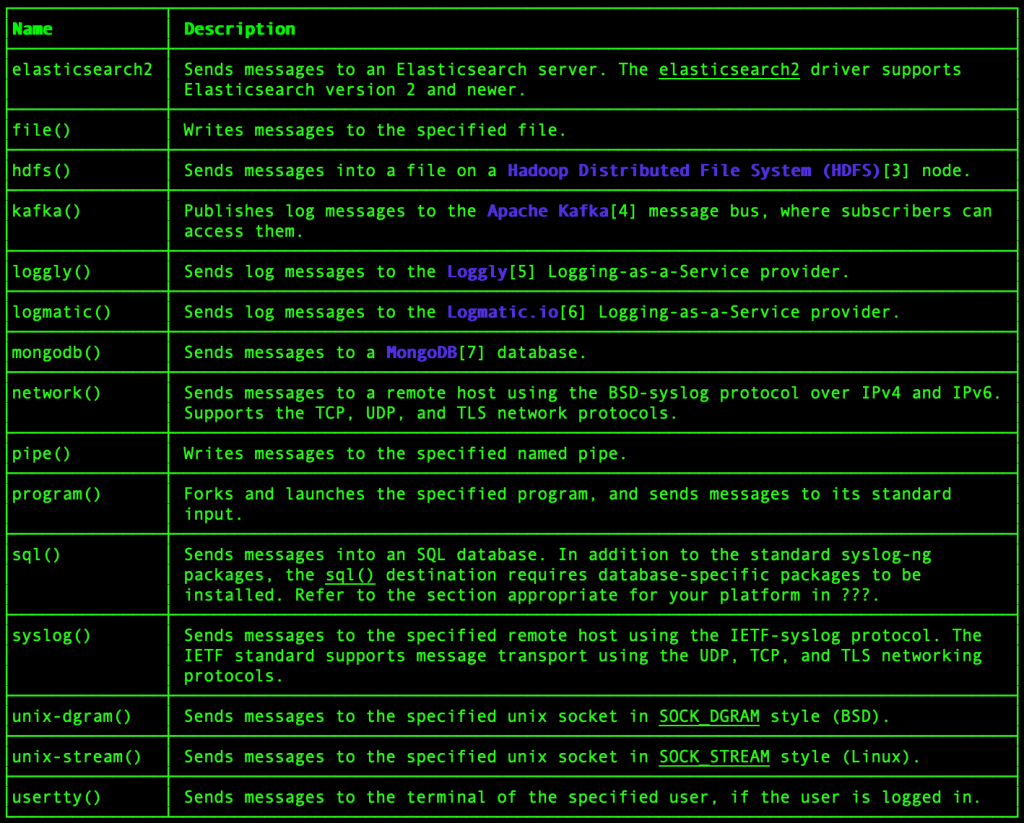
Below are the supported destination driver, it includes elastic search, Hadoop, Kafka and much more.

The defined destination will save the logs under separate directories under a year/month/day format with required ownership and permissions.
destination d_linux_logs {
     file(
         "/all_srv_remote_logs/linuxsyslog/${YEAR}/${MONTH}/${DAY}/${HOST}-syslog.log"
         owner("root")
         group("root")
         perm(0600)
         dir_perm(0600)
         create_dirs(yes)
         );
     };
# Rule defined to save the Linux logs
log {
    source(s_network); destination(d_linux_logs);
};
Define a destination file for audit logs, later it can be forwarded to any additional “destination(d_linuxsplunk)” destinations.
destination d_audit_logs {
     file(
         "/all_srv_remote_logs/linuxsyslog/audit/audit.log"
         owner("root")
         group("root")
         perm(0600)
         dir_perm(0600)
         create_dirs(yes)
         );
     };
# Rule defined to save the audit logs
log {
    source(s_audit); destination(d_audit_logs);
};
The final result of custom config for my home lab setup is below.
@version: 3.22
#
options {
    time-reap(30);
    mark-freq(10);
    time_reopen (10);
    flush_lines (0);
    log_fifo_size (1000);
    chain_hostnames (off);
    use_dns (no);
    use_fqdn (no);
    create_dirs (no);
    keep-hostname(yes);
};
#
# Reading local file as source
source s_audit {
    file("/var/log/audit/audit.log");
};
#
# All servers in 192.168.0.0/24 network will sent logs to 192.168.0.29.
source s_network {
    syslog(ip(192.168.0.29) transport("udp"));
};
#
# The received logs are saved to a specific location by segregating it to Year, month, date and hostname.
destination d_linux_logs {
    file(
        "/all_srv_remote_logs/linuxsyslog/${YEAR}/${MONTH}/${DAY}/${HOST}-syslog.log"
        owner("root")
        group("root")
        perm(0600)
        dir_perm(0600)
        create_dirs(yes)
        );
    };
# Rule defined to save the Linux logs
log {
    source(s_network); destination(d_linux_logs);
};
#
# Audit Logs
destination d_audit_logs {
     file(
         "/all_srv_remote_logs/linuxsyslog/audit/audit.log"
         owner("root")
         group("root")
         perm(0600)
         dir_perm(0600)
         create_dirs(yes)
         );
     };
# Rule defined to save the audit logs
log {
    source(s_audit); destination(d_audit_logs);
};
#
Once complete with configuring, Check for Syntax error using
# syslog-ng --syntax-only
# syslog-ng -s
Create a dedicated filesystem
If the destination of the log location is not defined to any custom location, the logs will be sent to /var/log/messages. As soon as our other clients start to send the logs the underlying filesystem /var/log/ will fill-up. This can be avoided by storing the received logs in a dedicated large size filesystem.
Let’s create a dedicated logical volume with the filesystem and mount it under /all_srv_remote_logs. If you are looking to create a logical volume, this guide will be helpful.
Under the newly created filesystem, I have created a new directory called linuxsyslog.
Both the directories are currently with default SELinux labels. Before starting to send the logs under this location, we need to make sure to label the filesystem with var_log_t SELinux context.
[root@syslogng ~]# ls -lthdZ /all_srv_remote_logs/
 drwxr-xr-x. 3 root root system_u:object_r:default_t:s0 25 Dec 28 16:32 /all_srv_remote_logs/
 [root@syslogng ~]# ls -lthdZ /all_srv_remote_logs/*
 drwxr-xr-x. 2 root root unconfined_u:object_r:default_t:s0 6 Dec 28 20:46 /all_srv_remote_logs/linuxsyslog
[root@syslogng ~]#
Label the newly created filesystem and underlying directories with var_log_t SELinux context.
# semanage fcontext -a -t var_log_t "/all_srv_remote_logs(/.*)?"
Restore the context, now the updated context should start to reflect.
[root@syslogng ~]# restorecon -Rv /all_srv_remote_logs/
Relabeled /all_srv_remote_logs from system_u:object_r:default_t:s0 to system_u:object_r:var_log_t:s0
Relabeled /all_srv_remote_logs/linuxsyslog from unconfined_u:object_r:default_t:s0 to unconfined_u:object_r:var_log_t:s0
[root@syslogng ~]#
Once again check and confirm the same.
[root@syslogng ~]# ls -lthdZ /all_srv_remote_logs/
 drwxr-xr-x. 3 root root system_u:object_r:var_log_t:s0 25 Dec 28 16:32 /all_srv_remote_logs/
 [root@syslogng ~]#
 [root@syslogng ~]# ls -lthdZ /all_srv_remote_logs/*
 drwxr-xr-x. 3 root root unconfined_u:object_r:var_log_t:s0 18 Dec 28 20:51 /all_srv_remote_logs/linuxsyslog
[root@syslogng ~]#
If we fail to label the filesystem, we can’t see any logs under the custom location. To troubleshoot the same, checking the logs, we could see similar to below permission denied error in our /var/log/messages log files.
Dec 28 20:46:25 syslogng syslog-ng[8631]: Error opening file for writing; filename='/all_srv_remote_logs/linuxsyslog/2020/12/28/gateway.log', error='Permission denied (13)'
Dec 28 20:46:35 syslogng syslog-ng[8631]: Error opening file for writing; filename='/all_srv_remote_logs/linuxsyslog/2020/12/28/gateway.log', error='Permission denied (13)'
Or you can look for journal of syslog-ng service.
# journalctl _SYSTEMD_UNIT=syslog-ng.service
Start the Service
To make effective the configuration changes, restart the service using the # systemctl reload syslog-ng command.
Enable and start the service persistently.
# systemctl enable syslog-ng
# systemctl start syslog-ng
# systemctl status syslog-ng
Output for reference
[root@syslogng ~]# systemctl status syslog-ng
 ● syslog-ng.service - System Logger Daemon
    Loaded: loaded (/usr/lib/systemd/system/syslog-ng.service; enabled; vendor preset: enabled)
    Active: active (running) since Mon 2020-12-28 04:08:06 +04; 7s ago
      Docs: man:syslog-ng(8)
  Main PID: 6095 (syslog-ng)
     Tasks: 3 (limit: 4551)
    Memory: 2.4M
    CGroup: /system.slice/syslog-ng.service
            └─6095 /usr/sbin/syslog-ng -F -p /var/run/syslogd.pid
 Dec 28 04:08:06 syslogng.linuxsysadmins.local systemd[1]: Starting System Logger Daemon…
 Dec 28 04:08:06 syslogng.linuxsysadmins.local syslog-ng[6095]: [2020-12-28T04:08:06.690060] WARNING: With use-dns(no), dns-cache() >
 Dec 28 04:08:06 syslogng.linuxsysadmins.local systemd[1]: Started System Logger Daemon.
[root@syslogng ~]#
Now if we check the port it should listen on 514
[root@syslogng ~]# netstat -tunlp
 Active Internet connections (only servers)
 Proto Recv-Q Send-Q Local Address           Foreign Address         State       PID/Program name
 tcp        0      0 0.0.0.0:22              0.0.0.0:*               LISTEN      817/sshd
 tcp6       0      0 :::22                   :::*                    LISTEN      817/sshd
 udp        0      0 192.168.0.29:514        0.0.0.0:*                           8884/syslog-ng
[root@syslogng ~]#
We have completed with server side configurations.
Client Side Configuration
Before starting anything on client side, make sure you are able to reach the syslog server at 514/UDP.
[root@gateway ~]# nc -uvz 192.168.0.29 514
Ncat: Version 7.70 ( https://nmap.org/ncat )
Ncat: Connected to 192.168.0.29:514.
Ncat: UDP packet sent successfully
Ncat: 1 bytes sent, 0 bytes received in 2.01 seconds.
[root@gateway ~]#
Edit the rysyslog configuration file using anyone of your favorite text editor
# vim /etc/rsyslog.conf
Append the below at end of the file. This will send all the logs using (@) UDP protocol to 192.168.0.29 at port 514.
*.* @192.168.0.29:514That’s all the only configuration we are interested in client side.
Restart the service to make the changes.
# systemctl restart rsyslog
From now onwards the logs will be forwarded to syslog server.
Verify the forwarding
To do a quick test run the logger command and verify the same in syslog-ng server.
# logger "test message"
The same can be tested on the syslog server as well by listening on 514 port.
[root@syslogng ~]# nc -lvu  192.168.0.29 514
Ncat: Version 7.70 ( https://nmap.org/ncat )
Ncat: Listening on 192.168.0.29:514
Ncat: Connection from 192.168.0.16.
<13>Dec 28 21:13:39 gateway root[5943]: test message
<13>Dec 28 21:14:04 gateway root[5944]: This is test log message from gateway server
We could see the incoming contents, else check for the logs under /all_srv_remote_logs/linuxsyslog/
[root@syslogng ~]# tree -a -t -f /all_srv_remote_logs/
 /all_srv_remote_logs
 └── /all_srv_remote_logs/linuxsyslog
     └── /all_srv_remote_logs/linuxsyslog/2020
         └── /all_srv_remote_logs/linuxsyslog/2020/12
             └── /all_srv_remote_logs/linuxsyslog/2020/12/28
                 ├── /all_srv_remote_logs/linuxsyslog/2020/12/28/192.168.0.16-syslog.log
                 ├── /all_srv_remote_logs/linuxsyslog/2020/12/28/gateway-syslog.log
                 ├── /all_srv_remote_logs/linuxsyslog/2020/12/28/foreman-syslog.log
                 ├── /all_srv_remote_logs/linuxsyslog/2020/12/28/localhost-syslog.log
                 ├── /all_srv_remote_logs/linuxsyslog/2020/12/28/idm1-syslog.log
                 ├── /all_srv_remote_logs/linuxsyslog/2020/12/28/idm2-syslog.log
                 └── /all_srv_remote_logs/linuxsyslog/2020/12/28/idm3-syslog.log
 4 directories, 7 files
[root@syslogng ~]#
Validating
Validate the processed and forwarded logs
# syslog-ng-ctl stats

[root@syslogng ~]# syslog-ng-ctl stats
SourceName;SourceId;SourceInstance;State;Type;Number
global;payload_reallocs;;a;processed;132
global;sdata_updates;;a;processed;0
src.journald;s_sys#0;journal;a;processed;50
src.journald;s_sys#0;journal;a;stamp;1657046522
global;scratch_buffers_bytes;;a;queued;0
src.internal;s_sys#1;;a;processed;10
src.internal;s_sys#1;;a;stamp;1657046398
source;s_audit;;a;processed;286
destination;d_boot;;a;processed;0
destination;d_kern;;a;processed;0
source;s_sys;;a;processed;60
global;msg_clones;;a;processed;0
global;internal_queue_length;;a;processed;0
destination;d_spol;;a;processed;0
destination;d_mlal;;a;processed;0
center;;received;a;processed;346
destination;d_mesg;;a;processed;46
destination;d_mail;;a;processed;0
destination;d_auth;;a;processed;9
destination;d_cron;;a;processed;5
global;scratch_buffers_count;;a;queued;25769803776
center;;queued;a;processed;346
destination;d_audit_logs;;a;processed;286
[root@syslogng ~]#
That’s it.
Forwarding Syslog-ng to Splunk
As an additional step, If we need to forward this logs from Syslog-ng server to any one of the remote destinations we can do the same.
In my home lab I have forwarded all the logs from Syslog-ng to a Splunk server, Below is the forward rule I’m using with.
My Splunk Server IP is 192.168.0.123
# Destination defined to forward log from syslog-ng to remote Splunk Server
destination d_linuxsplunk {
    tcp (
        "192.168.0.123"
        port (514)
        );
    };

# Rule defined to save the logs locally in a file, to forward to another destination.
log {
    source(s_network); destination(d_linux_logs); destination(d_linuxsplunk);
};
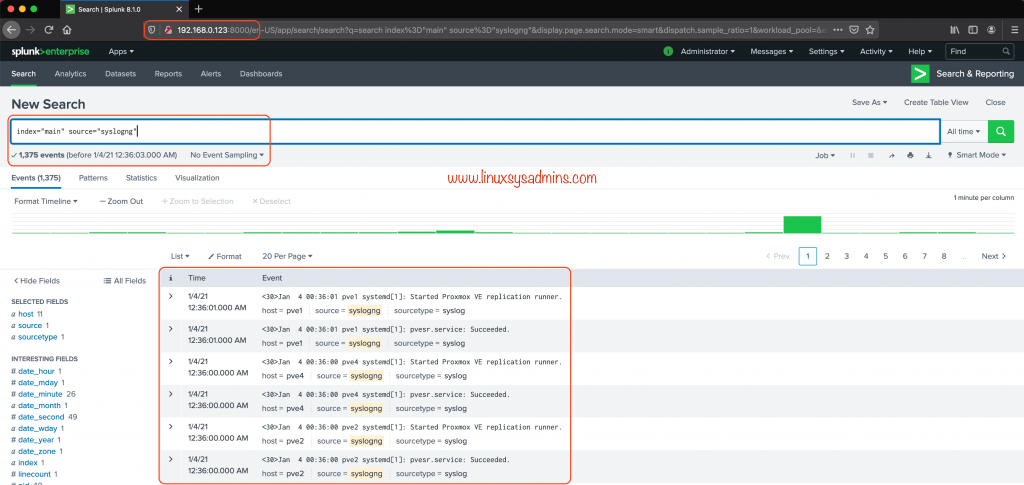
Lets verify on Splunk for new logs from the Syslog-ng server.

That’s it, both saving in a file and forwarding to new destinations are works fine.
Automate Client configuration
If you have hundreds of clients to configure better use Ansible.
Adding the rsyslog configuration.
$ ansible -b -m lineinfile -a 'insertafter=EOF line="*.* @192.168.0.29:514" path=/etc/rsyslog.conf' infra -K -k -u root
Verify the changes.
[ansible@gateway ~]$ ansible -b -m shell -a "cat /etc/rsyslog.conf | tail -n 3" infra -K -k -u root
SSH password:
BECOME password[defaults to SSH password]:
192.168.0.19 | CHANGED | rc=0 >>
#*.* @@remote-host:514
# ### end of the forwarding rule ###
*.* @192.168.0.29:514
192.168.0.23 | CHANGED | rc=0 >>
# remote_host is: name/ip, e.g. 192.168.0.1, port optional e.g. 10514
#Target="remote_host" Port="XXX" Protocol="tcp")
*.* @192.168.0.29:514
192.168.0.51 | CHANGED | rc=0 >>
# remote_host is: name/ip, e.g. 192.168.0.1, port optional e.g. 10514
#Target="remote_host" Port="XXX" Protocol="tcp")
*.* @192.168.0.29:514
192.168.0.22 | CHANGED | rc=0 >>
# remote_host is: name/ip, e.g. 192.168.0.1, port optional e.g. 10514
#Target="remote_host" Port="XXX" Protocol="tcp")
*.* @192.168.0.29:514
192.168.0.21 | CHANGED | rc=0 >>
# remote_host is: name/ip, e.g. 192.168.0.1, port optional e.g. 10514
#Target="remote_host" Port="XXX" Protocol="tcp")
*.* @192.168.0.29:514
[ansible@gateway ~]$
To restart the rsyslog service.
$ ansible -b -m systemd -a "name=rsyslog.service state=restarted" infra -K -k -u root
That’s it, we have completed with setting up a centralized syslog server using syslog-ng.
Conclusion
Managing the logs in a centralized location is important when it coming to a production, staging, development or test environment. Logs are the only source we will have to find the root cause of any issue. To save the logs in a centralized location lets set up a Syslog server and start to sent the logs from clients. Your feedbacks are welcome through below comment section, subscribe to our newsletter for more how-to guides.
Awesome as always very helpful…