Table of Contents
Introduction to LVM
LVM, The topic which we are about to cover today is most important for every Linux system administrators. Let see how to set up Logical volume management from scratch and how to manage it to the extreme end. This series of the guide will cover with a number of topics which make sure yourself as a pro in handling Logical volume management in Linux.
LVM, The topic which we are about to cover today is most important for every Linux system administrators. Let see how to set up Logical volume management from scratch and how to manage it to the extreme end. This series of the guide will cover with a number of topics which make sure yourself as a pro in handling Logical volume management in Linux.
Logical Volume Management Series:
- Create Logical volume management LVM file-system in Linux
- Extend and Reduce LVM Logical Volume Management in Linux
- Shrink a Volume Group in Logical Volume Management (LVM)
- Striped Logical Volume in Logical volume management (LVM)
- Migrate from single-partition boot device to LVM in CentOS7
- Creating a Logical volume-based file system using Ansible
What is the use of LVM?
Logical volume management is a flexible file system that can be created small in size and later we can expand it to huge by adding multiple disks on the fly. In case, initially, you got a regular filesystem small in size. But later your business growth was good and you may require to increase your storage size to store more data. In this situation, we can accomplish our filesystem extension using LVM.
Where to use LVM?
You can use LVM across all the Linux platforms including your Linux-based desktop computers.
Abbreviations used in this guide.
- LVM Logical Volume Management
- PV Physical Volume
- VG Volume Group
- LV Logical Volume
- PE Physical Extent
Creating a Logical volume we need to follow only four steps, they are
- Create a partition on the RAW disk.
- Define Physical volume on the partitioned disk.
- Prepare Volume group using the created Physical volume.
- Creating a Logical Volume from Volume group’s available space.
This is how Logical volume can be shown in a picture.
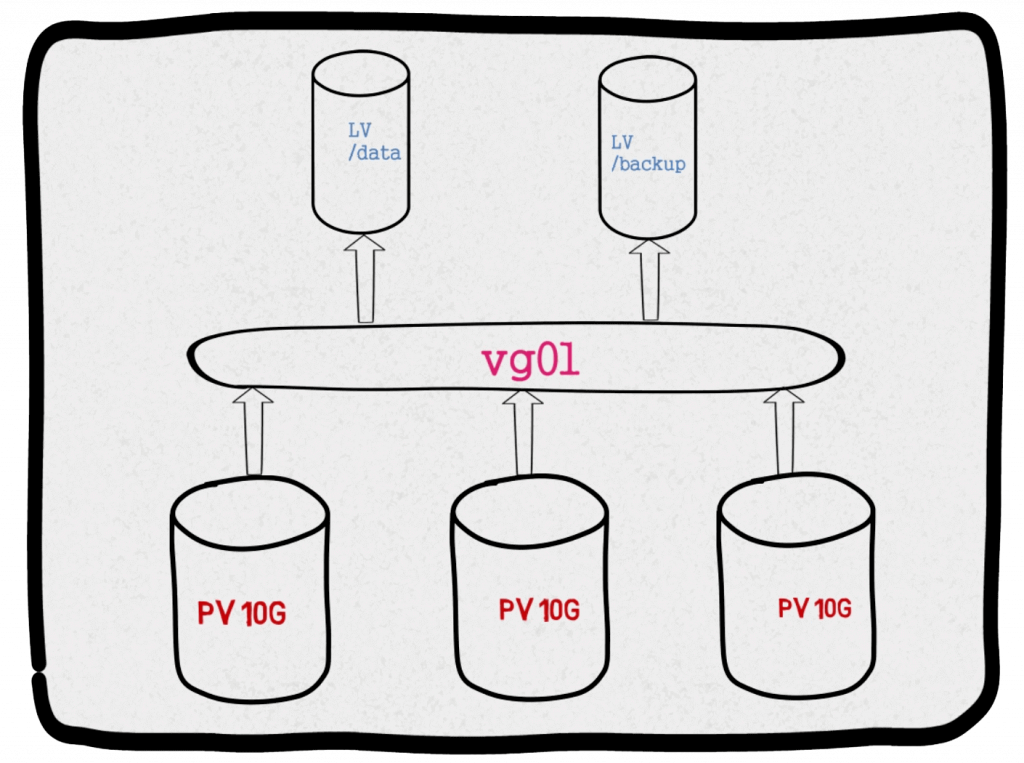
Step 1: Partitioning the disk for creating Physical volume.
Initially, we need to start with partitioning the disk to create a physical volume. Let see how to partition a disk using FDISK.
Read more about “Creating a partition using FDISK in Linux“.
List the disk using “-l” option with “fdisk” command.
# fdisk -l /dev/sdb
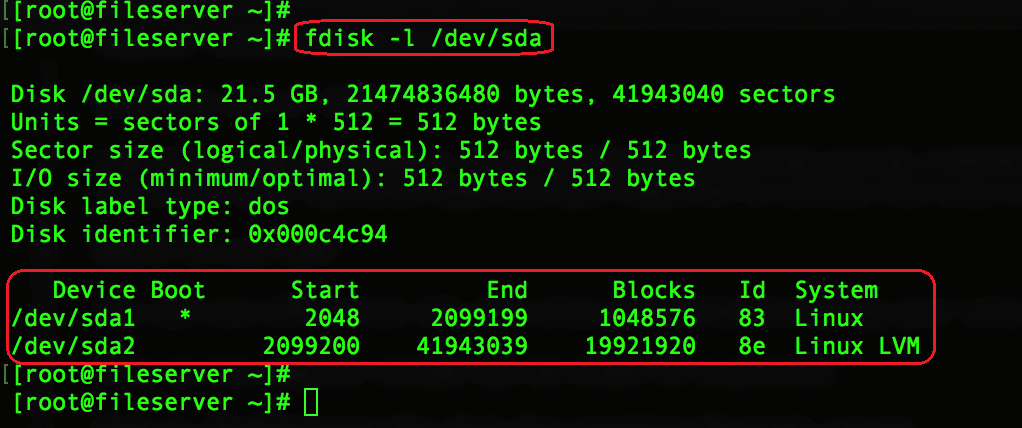
It’s good to know about the currently available setup before creating with any partitions, physical volume, volume group, and logical volume.
List the available PV, VG, and LV to verify.
- PVS Display small information about Physical volumes.
- VGS Display small information about Volume Groups.
- LVS Display small information about logical volumes.
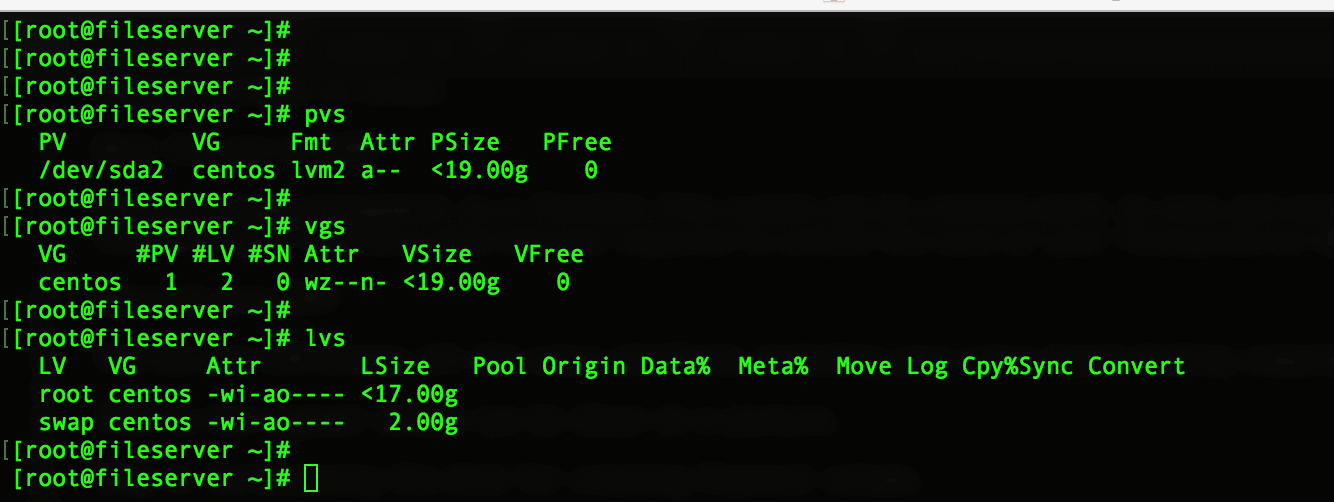
Begin with creating the partition, Let’s briefly explain what are the options and their uses.
[stextbox id=”alert” caption=”Warning”]All the data in this disk will be lost and unrecoverable, Make sure to select the right disk.[/stextbox]# fdisk -uc /dev/sdb
- Fdisk Command used to create the disk partitions
- u Using the unit (Sectors or Cylinders)
- c Compatibility mode for DOS or NON-DOS
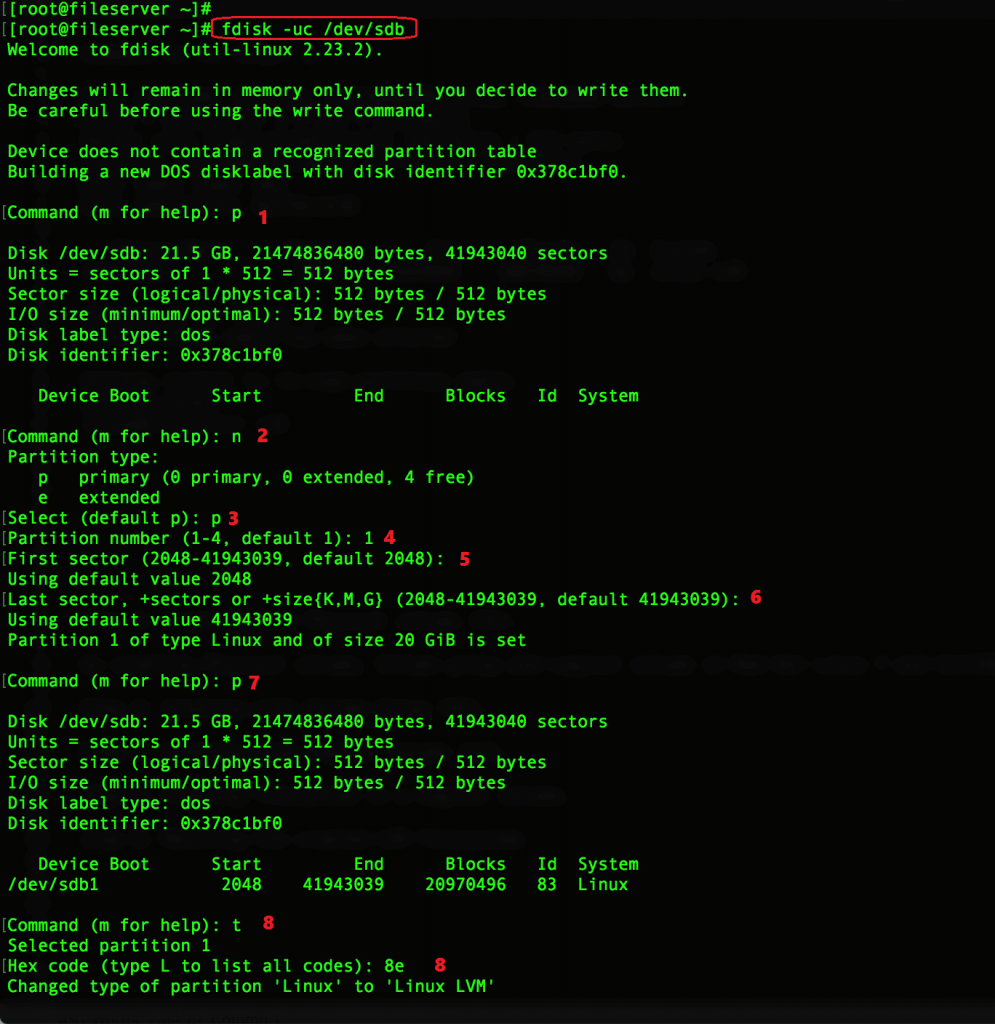

Options which we used inside the fdisks are as follows.
- P print the existing partition
- n create a new partition
- p create with a new primary partition
- 1 Assign the number to mark the partition as the first primary partition.
- Entre to choose 2048 as the first sector.
- Enter once again to utilize the full disk space for a single primary partition.
- p Print and verify the created disk
- t Change the type of partition to LVM using “8e”.
- p Again print and verify before writing changes.
- w write and exit from the fdisk utility.
Once completed with creating the partition we will get the output as follows.

Inform to the kernel about new partition
# partprobe /dev/sdb1
That’s it, we have created with partitioning using FDISK.
Step 2: Creating with Physical volume (PV).
Method 1:
We have a partition ready now, by following we need to create with a physical volume. This is a super easy step but we need to make sure to pick the right disk we about to create with the physical volume.
# pvcreate /dev/sdb1

List the created physical volume using “pvs” for short summary, else verify with more detailed information using “pvdisplay“. Running only “pvs” command will list all the physical volumes. If we need to list only with the created one use “pvs” or “pvdisplay” by following created partition.
# pvs
# pvdisplay
# pvs /dev/sdb1
# pvdisplay /dev/sdb1
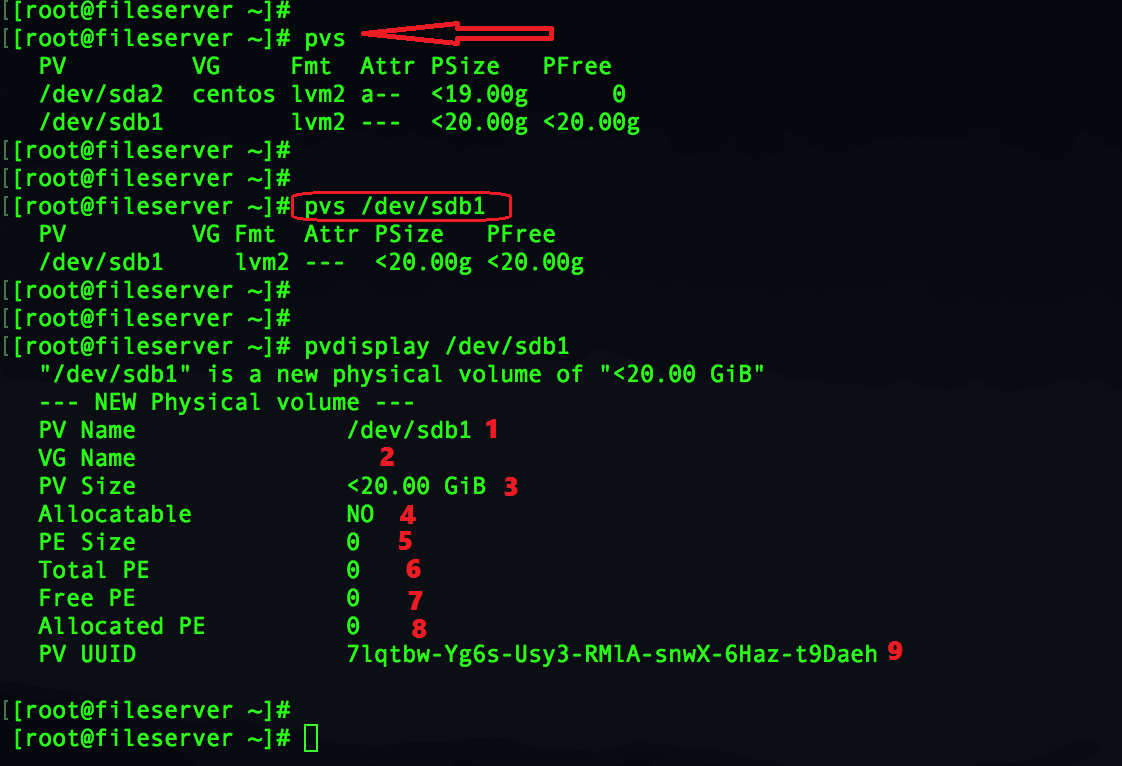
More explanation about “pvdisplay” output is as follows.
- Name of the physical volume, This will be partition we are using.
- If this PV associated with any VG it will display here with VG name.
- Size of the disk used as PV
- Not yet allocated for any logical volume so it will be “NO”.
- PE size, This will be with some value once we create the Volume Group.
- Point 6, 7, 8 will be applied once VG created.
- “
- “
- A Universal Unique identifier (UUID) of Physical volume.
if you are puzzled by asking yourself what is PE? It will be covered in step 3 while we create with a Volume group.
PE ⇒ Physical extent
Method 2:
Another example of how to create a physical volume with multiple disks in a single shot. If the RAW disks are partitioned use 1 at the end of the command else use only the drive letter.
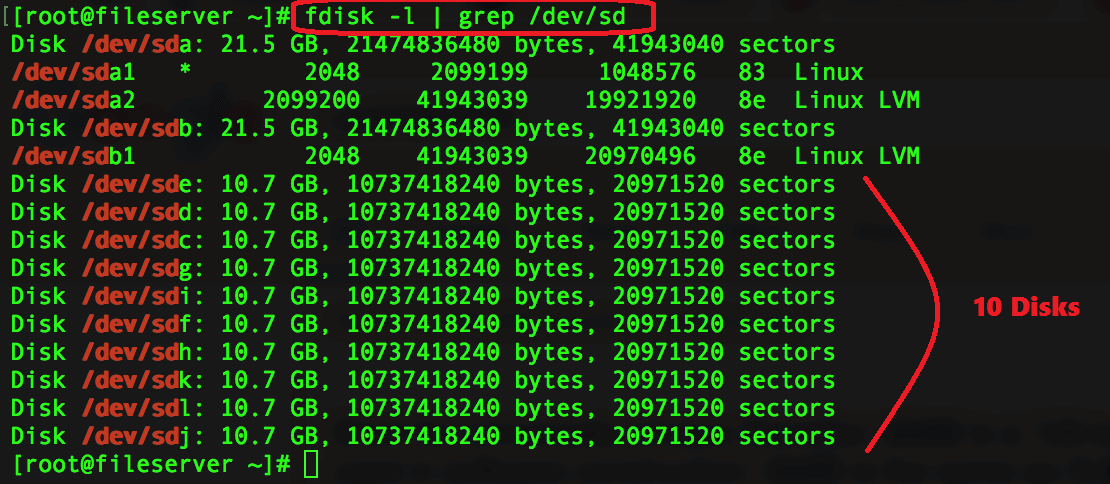
Here I have 10 numbers of the 10GB disk and I need to create 10 physical volumes.
List the lists of newly added disks.
# fdisk -l | grep /dev/sd
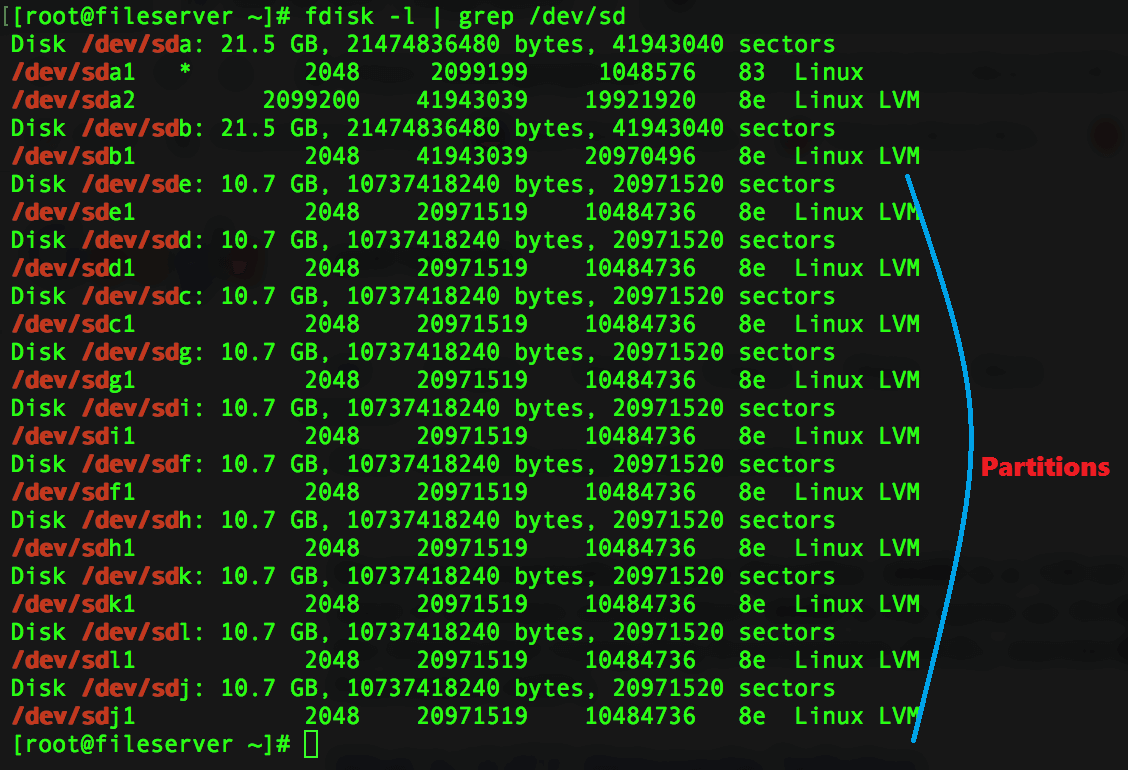
Create the partitions in all 10 disks.
Create the physical volumes in bulk using a single command.
# pvcreate /dev/sd[c-l]1
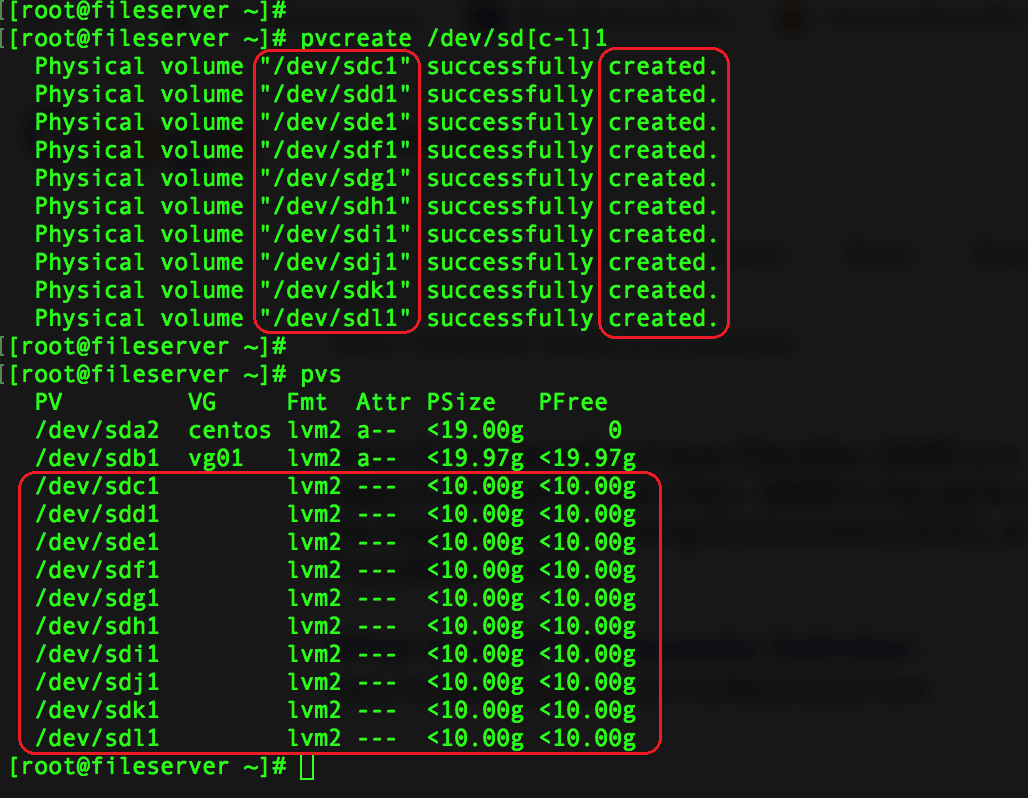
This is the end of method two.
We have completed step 2 by creating a Physical volume.
Step 3: Creating with Volume Group (VG).
Volume groups are a group of physical volumes to form a single pool structure. For example, we have 10 physical volumes each with 1 TB in size. If we use all the 1TB to create a “Volume group” your single volume group will have 10TB of capacity.
To get a complete understanding of the Volume group first we need to get an idea about what is the physical extent. Extends are block size of each physical volume, By default, a single extent size will be 4 MB it can be range from 8KB to 16GB in size. If we need to create extends in different sizes it is possible while create a Volume Group by using the “-s” option.
For instance, A volume group called “vg01” has one physical volume, with 20 GB in size. How to know the total number of extents in “vg01” volume group? By running
Small Calculation
(1GB) 1024 X 20 (GB) = 20480 ( 20 GB) / 4 (MB) = 5120 PE.
For 1 number of 20GB disk, we will get 5120 Physical extends, Let’s create a Volume group and confirm the above calculation.
Create a volume group in the name of “vg01” using default PE size under physical volume “/dev/sdb1” and list it with “vgs” and “vgdisplay” to know more information.
# vgcreate vg01 /dev/sdb1
# vgs
# vgdisplay vg01
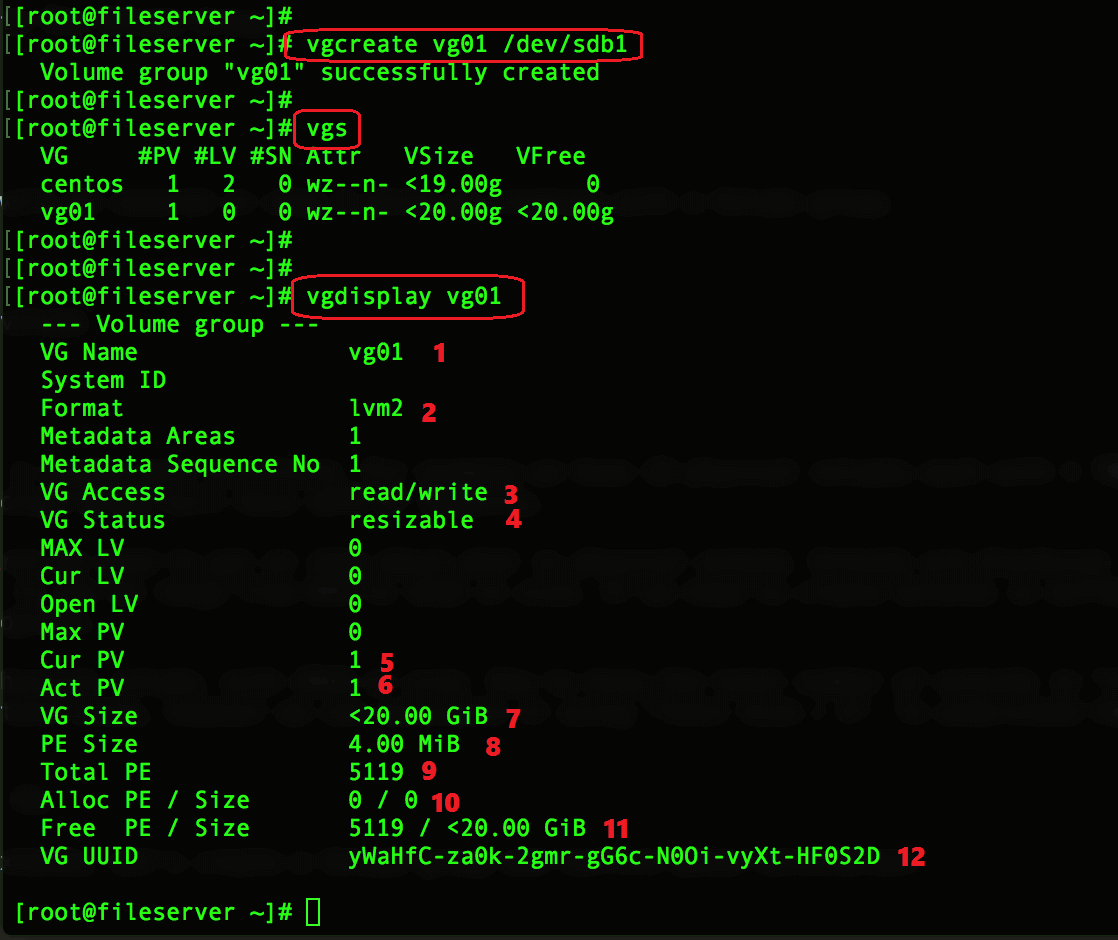
- Name of the Volume group.
- what type of LVM used. (LVM2)
- VG Status for access.
- VG can we extended or reduced.
- Currently how many PV under this VG.
- Currently active PV under this VG.
- The total size of the VG.
- Each PE size used while created this VG.
- Total available size of PE.
- Used or allocated PE.
- The total number of Free PE in VG.
- UUID of Volume group.
We have used the default size of PE 4MB to create this VG, Let see how to create a VG with 32 MB of PE size.
# vgcreate -s 32 vg01 /dev/sdb1 # vgs vg01 # vgdisplay vg01
A small calculation for PE size.
1024 x 20 = 20480 / 32 = 640 PE
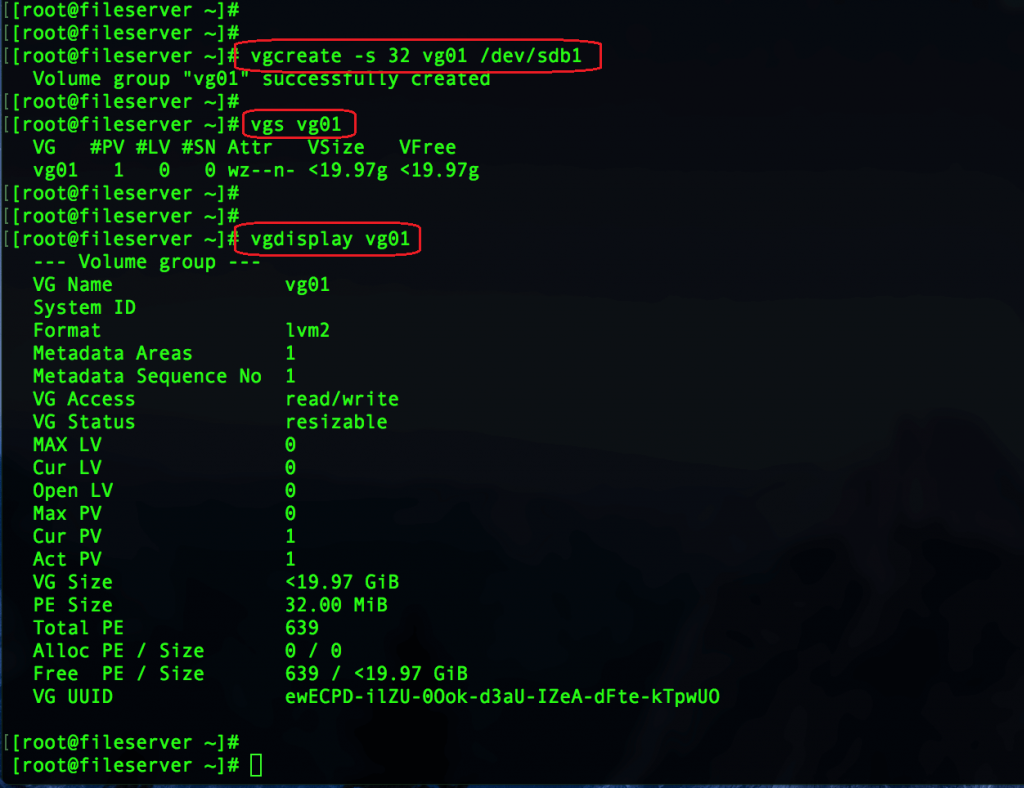
FYI, Now when you run “pvdisplay /dev/sdb1” you will get more information which we discussed in Step 2 at points 6, 7, and 8.
pvdisplay /dev/sdb1
 [root@fileserver ~]# pvdisplay /dev/sdb1
 --- Physical volume ---
 PV Name /dev/sdb1
 VG Name vg01
 PV Size <20.00 GiB / not usable 3.00 MiB
 Allocatable yes
 PE Size 4.00 MiB
 Total PE 5119
 Free PE 5119
 Allocated PE 0
 PV UUID 7lqtbw-Yg6s-Usy3-RMlA-snwX-6Haz-t9Daeh
 [root@fileserver ~]#
Creating a VG using multiple Physical volumes (PV).
Before we have seen how to create a Volume group using a single disk. Now let us create a Volume Group in the name of “VG02” with 8 MB physical extent using 10 number of physical volumes.
In a hard way by pointing to every device.
# vgcreate -s 8 vg02 /dev/sdc1 /dev/sdd1 /dev/sde1 /dev/sdf1 /dev/sdg1 /dev/sdh1 /dev/sdi1 /dev/sdj1 /dev/sdk1 /dev/sdl1

In a lazy way and being smart.
# vgcreate -s 8 vg02 /dev/sd[c-l]1
# vgs
# vgdisplay vg02
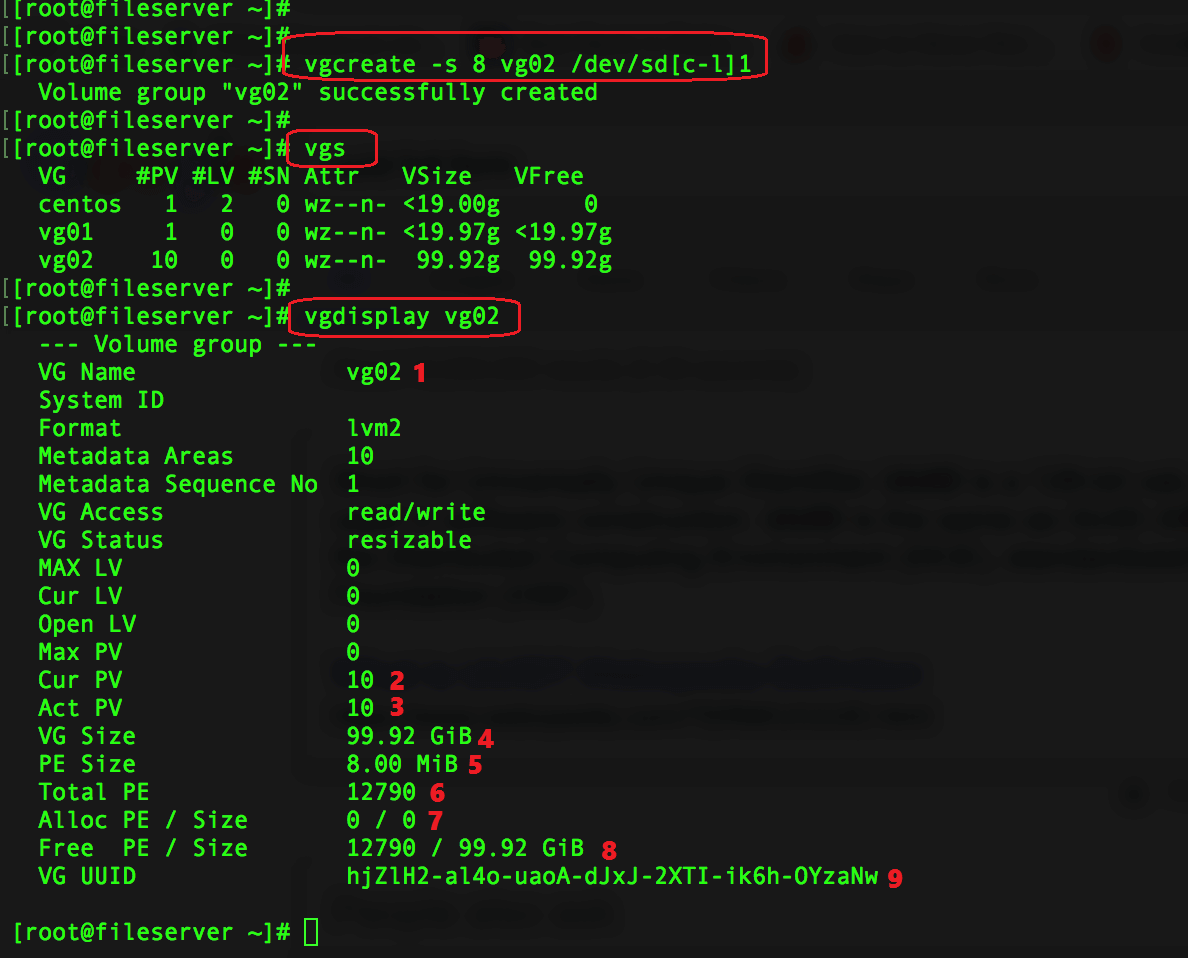
- Volume group name.
- The number of physical volumes used in vg02.
- How many physical volumes are active.
- The total size of a volume group.
- PE size used while creating the Volume group.
- Total number of PE available in this Volume group.
- How much PE’s are used (We not yet used, because not yet created with LV)
- Free PE in vg02.
- UUID of Volume group.
We have completed method 2 for creating the Volume group.
Step 4: Creating with Logical Volume (LV).
Logical volumes can be created only from the Volume group space. If VG does not have enough space we can’t create with a Logical volume.
Now let us create 2 Logical volumes using different methods. To create an LVM using round the unit size we need to use Capital “-L”, Same if we need to create with an extent replace it with small “-l”.
Create a Logical volume using Unit Size. (-L)
Create another logical volume in the name of “data” using 5G under “vg01”.
[stextbox id=”info” caption=”info”]LV can be created using units K for KB, M for MB, G for GB and T for TB in size.[/stextbox]
List the current VG and LV before creating one to verify whether we have enough space in vg01.
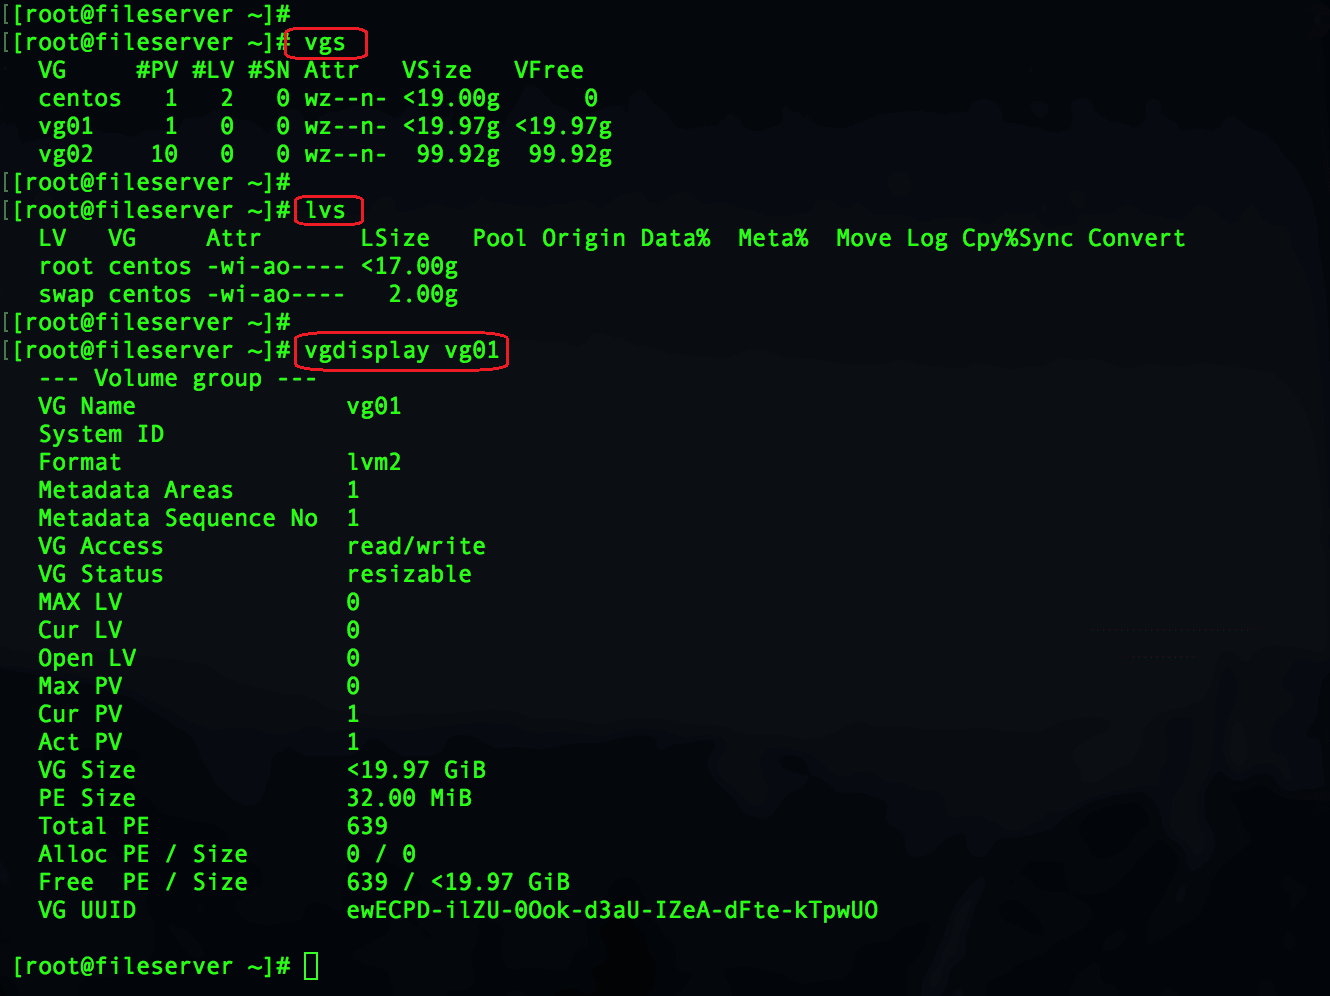
Creating logical volume with Unit size.
# lvcreate -n data -L 5G vg01
# lvs
# lvdisplay /dev/mapper/vg01-data
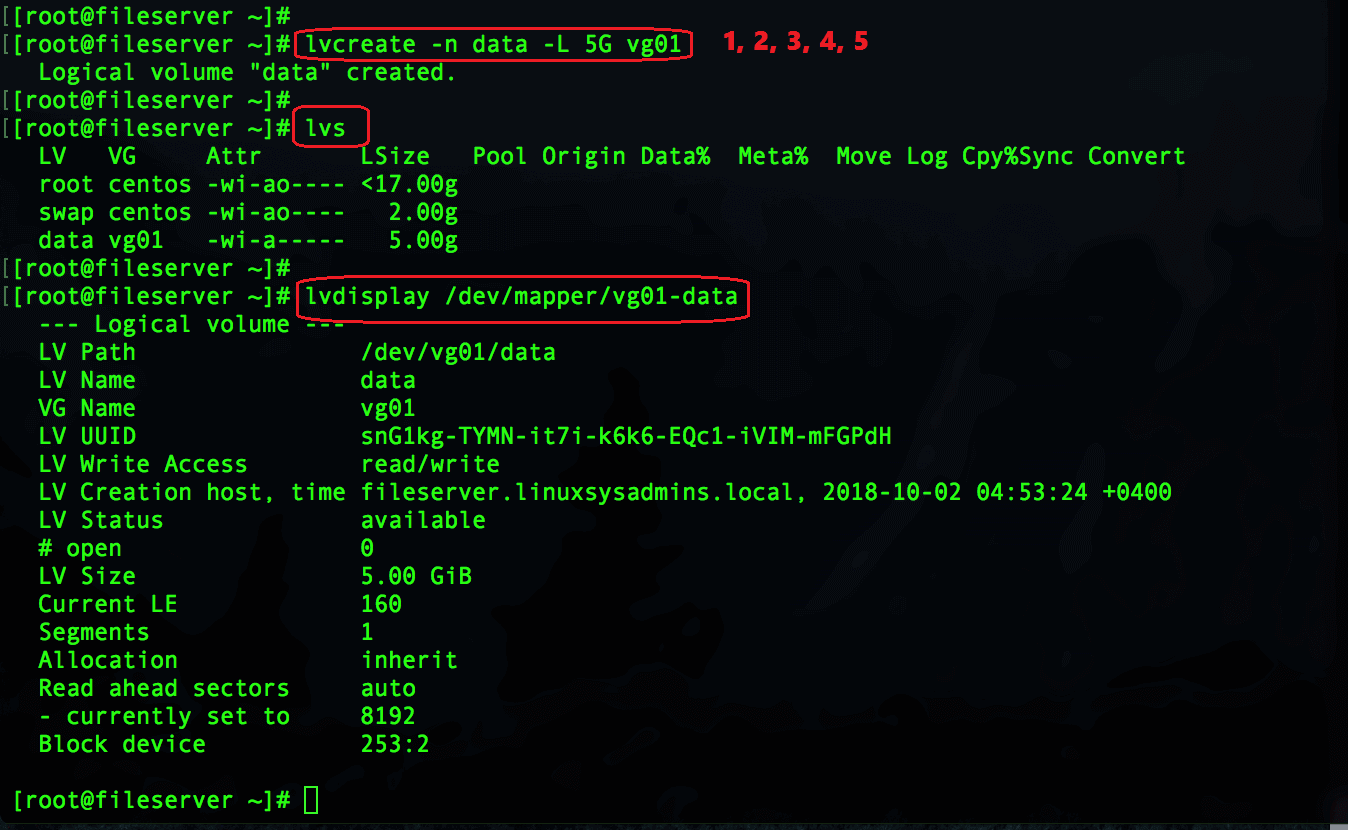
- lvcreate the command to create the logical volume
- -n to give a name to logical volume
- data name of the logical volume we created.
- -L creating a logical volume using Unit size (K, M, G, T).
- 5G size of the logical volume in GB
- vg01 Under which volume group the LV needs to be created.
We have completed creating a logical volume with 5GB in size.
Create a Logical volume using Physical Extent (PE). (-l)
Create a logical volume in the name of “backup” using 160 PE under “vg01“.
While creating “VG01” we have used 32MB as physical extent (PE) size so need to do a simple calculation to know the 5GB of size in physical extent.
1024 X 5 = 5120 / 32 = 160
1024 (1GB) X 5 (GB) = 5120 (MB) / 32 (PE)= 160 PE
List and verify the existing VG and LV.

Create the Logical volume (LV) using physical extent size.
# lvcreate -l 160 -n backup vg01
# lvs
# lvdisplay /dev/mapper/vg01-backup
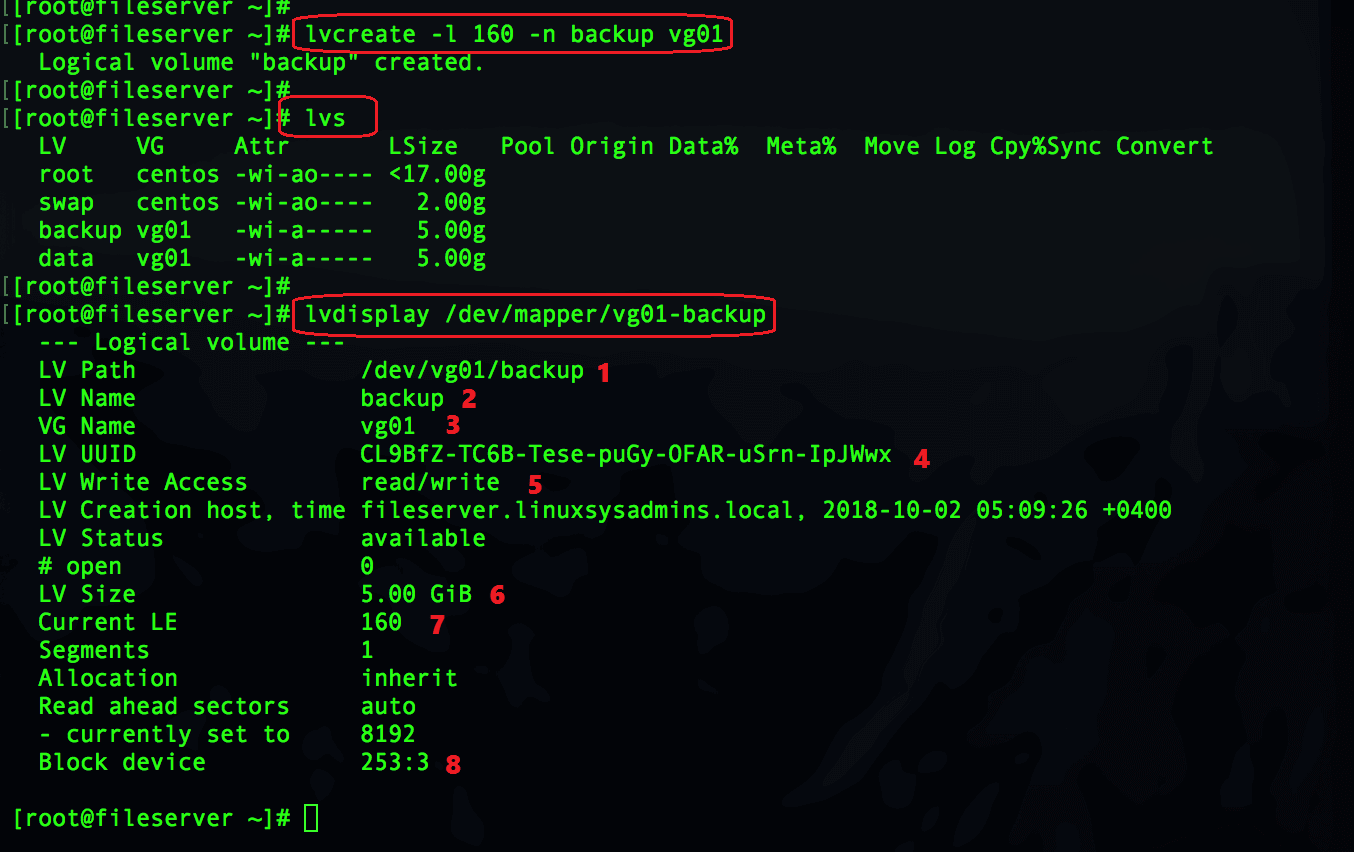
- -n to give a name
- backup name of the logical volume we created.
- -l creating a logical volume using extend.
- 160 Physical extends used. Each PE size is 32M
- vg01 Under which volume group the LV has been created.
Understanding “lvdisplay” output.
- Under which path the LV created.
- Name of the LV
- LV underlying in which VG
- UUID of LV
- The current mode of LV
- Size of the LV created.
- Logical extends currently used in LV
- Under which block device the LV has been created. (/dev/sdb) Refer below step.
knowing the Block Devices and LVM.
# lsblk /dev/sdb

We have completed creating two Logical volumes. Finally, we need to move towards Step 5 to create a file system and mount it under any mount point in Linux.
Follow the below article to read about how to create a file system and mount it on Linux servers.
Step 5: Creating and mounting the filesystem in Linux
If you are looking for LVM articles follow the below link to continue reading the series.
Extend and Reduce LVM Logical Volume Management in Linux
Conclusion:
Every Linux sysadmins should familiar with Logical volume management and creating filesystem to provide uninterrupted support in our daily day-to-day operations. In this guide, we have covered briefly how to create a Logical volume. By following we are about to continue with more advanced topics about LVM. We are eager to hear from you any feedback, Never miss an update from us by subscribing to our newsletters.

One thought on “Create Logical volume management LVM file-system in Linux”
Comments are closed.