
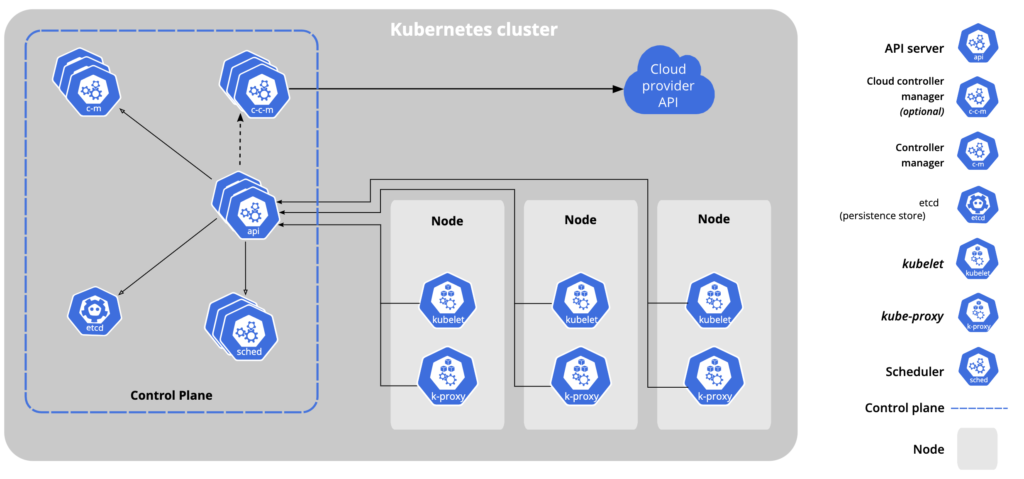
Introduction to HA Kubeadm
In this blog post, we will be implementing High Availability (HA) Kubernetes clusters using kubeadm! In this guide, we’ll explore how to leverage kubeadm on Rocky Linux 9.4 to set up resilient and fault-tolerant Kubernetes environments. Whether you’re new to HA setups or looking to enhance your existing cluster’s reliability, this article will provide practical insights and step-by-step instructions to help you achieve seamless operations and scalability.
The version we are going to use is Kubernetes v1.29, with plans to upgrade to the latest release in our upcoming guide.
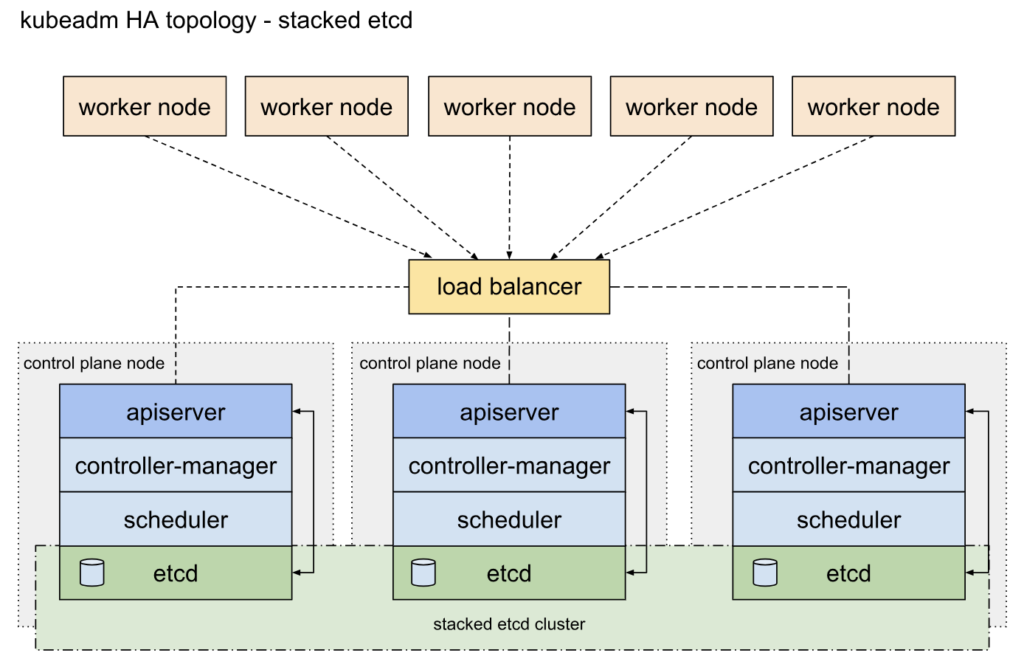
With stacked control plane nodes, this approach minimizes infrastructure requirements by co-locating etcd members and control plane nodes.
System Requirements
3 Node, Control Plane spec requirement – 4 GB, 4 CPU, 50 GB
3 Node, Worker node spec requirement – 16 GB, 8 CPU, 100 GB
1 Node, HAProxy node spec requirement – 2 GB, 2 CPU, 50 GB
DNS records for all k8s cluster nodes and HAProxy are created in IDM.
| FQDN | IP Address |
| kube-apiserver.linuxsysadmins.lan | 192.168.0.20 |
| k8smas1.linuxsysadmins.lan | 192.168.0.21 |
| k8smas2.linuxsysadmins.lan | 192.168.0.22 |
| k8smas3.linuxsysadmins.lan | 192.168.0.23 |
| k8swor1.linuxsysadmins.lan | 192.168.0.24 |
| k8swor2.linuxsysadmins.lan | 192.168.0.25 |
| k8swor3.linuxsysadmins.lan | 192.168.0.26 |
HAProxy Setup
If you are looking to setup a HAProxy for Kubernetes, refer
Sysadmin tools
Install below prerequisites across all nodes
# dnf install wget curl vim bash-completion nc tcpdump telnet bind-utils -yDisable Swap
Disable Swap and remove the FSTAB entry
$ swapoff -a
$ vim /etc/fstab
Remove the swap entries from /etc/default/grub
# vim /etc/default/grub

rd.lvm.lv=vg01/swap
resume=/dev/mapper/vg01-swap
Save and exit, and rebuild the grub
# grub2-mkconfig -o /boot/grub2/grub.cfgSELinux configuration
SELinux should be in permissive mode, change the mode and make sure to set the config persistent.
# setenforce 0
# sudo sed -i 's/^SELINUX=enforcing$/SELINUX=permissive/' /etc/selinux/config
Firewall requirements
We need number of ports across both control plane and worker nodes, make sure to allow below ports.
On Control Plane or Master nodes
# firewall-cmd --permanent --add-service={kube-apiserver,kube-control-plane,kube-control-plane-secure,kube-api,kube-worker}
# firewall-cmd --permanent --zone=trusted --add-interface=lo
# firewall-cmd --permanent --zone=trusted --add-service={kube-api,kube-scheduler,kube-scheduler-secure,kube-controller-manager}
# firewall-cmd --reload
# firewall-cmd --list-all-zones
On Worker Nodes
# firewall-cmd --permanent --add-service=kube-worker
# firewall-cmd --permanent --zone=trusted --add-interface=lo
# firewall-cmd --permanent --zone=trusted --add-service=kube-api
# firewall-cmd --reload
# firewall-cmd --list-all-zones
Installing Container Runtimes CRI-O
In this setup, we are opting to use CRI-O as our container runtime, although other options such as containerd, Docker, and Mirantis are also available.
Forwarding IPv4 and letting iptables see bridged traffic
cat <<EOF | sudo tee /etc/modules-load.d/k8s.conf
overlay
br_netfilter
EOF
Sysctl parameters required during the setup.
cat <<EOF | sudo tee /etc/sysctl.d/k8s.conf
net.bridge.bridge-nf-call-iptables = 1
net.bridge.bridge-nf-call-ip6tables = 1
net.ipv4.ip_forward = 1
EOF
Apply the parameters without rebooting the servers
# sysctl --systemEnabling the modules and verify.
# modprobe overlay
# modprobe br_netfilter
# lsmod | grep br_netfilter
# lsmod | grep overlay
Make sure the value is set to 1.
# sysctl net.bridge.bridge-nf-call-iptables net.bridge.bridge-nf-call-ip6tables net.ipv4.ip_forwardSet the variable for Kubernetes platform version.
KUBERNETES_VERSION=v1.29
PROJECT_PATH=prerelease:/main
Create the required Kubernetes and CRI-O repositories
cat <<EOF | tee /etc/yum.repos.d/kubernetes.repo
[kubernetes]
name=Kubernetes
baseurl=https://pkgs.k8s.io/core:/stable:/$KUBERNETES_VERSION/rpm/
enabled=1
gpgcheck=1
gpgkey=https://pkgs.k8s.io/core:/stable:/$KUBERNETES_VERSION/rpm/repodata/repomd.xml.key
exclude=kubelet kubeadm kubectl cri-tools kubernetes-cni
EOF
cat <<EOF | tee /etc/yum.repos.d/cri-o.repo
[cri-o]
name=CRI-O
baseurl=https://pkgs.k8s.io/addons:/cri-o:/$PROJECT_PATH/rpm/
enabled=1
gpgcheck=1
gpgkey=https://pkgs.k8s.io/addons:/cri-o:/$PROJECT_PATH/rpm/repodata/repomd.xml.key
EOF
Install, start and enable the service.
# dnf install -y container-selinux
$ dnf install -y cri-o
$ systemctl start crio.service
$ systemctl enable crio.service
Installing Kubernetes packages
And the final packages required to setup the kubeadm HA cluster
$ dnf install -y kubelet kubeadm kubectl --disableexcludes=kubernetes
$ systemctl enable --now kubelet
Initializing Cluster
First we need to initialize on any one of the control plane
# kubeadm init --control-plane-endpoint "kube-apiserver.linuxsysadmins.lan:6443" --upload-certsOnce we run the above command, it will manage to download the required images to set up the kubernetes cluster.
[root@k8smas1 ~]# crictl images
IMAGE                                     TAG                 IMAGE ID            SIZE
registry.k8s.io/coredns/coredns           v1.11.1             cbb01a7bd410d       61.2MB
registry.k8s.io/etcd                      3.5.12-0            3861cfcd7c04c       151MB
registry.k8s.io/kube-apiserver            v1.29.6             3af2ab51e1364       129MB
registry.k8s.io/kube-controller-manager   v1.29.6             083b81fc09e85       123MB
registry.k8s.io/kube-proxy                v1.29.6             9c49592198fa1       83.7MB
registry.k8s.io/kube-scheduler            v1.29.6             49d9b8328a8fd       60.7MB
registry.k8s.io/pause                     3.9                 e6f1816883972       750kB
[root@k8smas1 ~]#
The long output has been truncated, copy and save the output for the future use.
[addons] Applied essential addon: CoreDNS
[addons] Applied essential addon: kube-proxy

Your Kubernetes control-plane has initialized successfully!

To start using your cluster, you need to run the following as a regular user:

  mkdir -p $HOME/.kube
  sudo cp -i /etc/kubernetes/admin.conf $HOME/.kube/config
  sudo chown $(id -u):$(id -g) $HOME/.kube/config

Alternatively, if you are the root user, you can run:

  export KUBECONFIG=/etc/kubernetes/admin.conf

You should now deploy a pod network to the cluster.
Run "kubectl apply -f [podnetwork].yaml" with one of the options listed at:
  https://kubernetes.io/docs/concepts/cluster-administration/addons/

You can now join any number of the control-plane node running the following command on each as root:

  kubeadm join kube-apiserver.linuxsysadmins.lan:6443 --token 5g52ya.fghnz6ayanqflro3 \
	--discovery-token-ca-cert-hash sha256:469a3a655048c8d1e170c44bf2529d9628c726966bd57de8045c55e4b50a8753 \
	--control-plane --certificate-key 800a08f0dc6ac8cdc64407318d6beef4236c72e59035c47baef10b186c435c53

Please note that the certificate-key gives access to cluster sensitive data, keep it secret!
As a safeguard, uploaded-certs will be deleted in two hours; If necessary, you can use
"kubeadm init phase upload-certs --upload-certs" to reload certs afterward.

Then you can join any number of worker nodes by running the following on each as root:

kubeadm join kube-apiserver.linuxsysadmins.lan:6443 --token 5g52ya.fghnz6ayanqflro3 \
	--discovery-token-ca-cert-hash sha256:469a3a655048c8d1e170c44bf2529d9628c726966bd57de8045c55e4b50a8753
[root@k8smas1 ~]#
Joining other Control Planes
Once we get the above output, join the other control planes by running.
# kubeadm join kube-apiserver.linuxsysadmins.lan:6443 --token 5g52ya.fghnz6ayanqflro3 \
	--discovery-token-ca-cert-hash sha256:469a3a655048c8d1e170c44bf2529d9628c726966bd57de8045c55e4b50a8753 \
	--control-plane --certificate-key 800a08f0dc6ac8cdc64407318d6beef4236c72e59035c47baef10b186c435c53
Joining Worker Nodes
Right after control plane start to join the worker nodes by running
# kubeadm join kube-apiserver.linuxsysadmins.lan:6443 --token 5g52ya.fghnz6ayanqflro3 \
	--discovery-token-ca-cert-hash sha256:469a3a655048c8d1e170c44bf2529d9628c726966bd57de8045c55e4b50a8753
Prepare the normal user to reach the API.
 $ mkdir -p $HOME/.kube
 $ sudo cp -i /etc/kubernetes/admin.conf $HOME/.kube/config
 $ sudo chown $(id -u):$(id -g) $HOME/.kube/config
Check for installed cluster version
[ansible@k8smas1 ~]$ kubectl version
Client Version: v1.29.6
Kustomize Version: v5.0.4-0.20230601165947-6ce0bf390ce3
Server Version: v1.29.6

[ansible@k8smas1 ~]$ kubeadm version
kubeadm version: &version.Info{Major:"1", Minor:"29", GitVersion:"v1.29.6", GitCommit:"062798d53d83265b9e05f14d85198f74362adaca", GitTreeState:"clean", BuildDate:"2024-06-11T20:22:13Z", GoVersion:"go1.21.11", Compiler:"gc", Platform:"linux/amd64"}
[ansible@k8smas1 ~]$
List the cluster nodes and verify the status.
[ansible@k8smas1 ~]$ kubectl get nodes -o wide
NAME                         STATUS   ROLES           AGE   VERSION   INTERNAL-IP    EXTERNAL-IP   OS-IMAGE                      KERNEL-VERSION                 CONTAINER-RUNTIME
k8smas1.linuxsysadmins.lan   Ready    control-plane   19m   v1.29.6   192.168.0.21   <none>        Rocky Linux 9.4 (Blue Onyx)   5.14.0-427.20.1.el9_4.x86_64   cri-o://1.31.0
k8smas2.linuxsysadmins.lan   Ready    control-plane   14m   v1.29.6   192.168.0.22   <none>        Rocky Linux 9.4 (Blue Onyx)   5.14.0-427.20.1.el9_4.x86_64   cri-o://1.31.0
k8smas3.linuxsysadmins.lan   Ready    control-plane   12m   v1.29.6   192.168.0.23   <none>        Rocky Linux 9.4 (Blue Onyx)   5.14.0-427.20.1.el9_4.x86_64   cri-o://1.31.0
k8swor1.linuxsysadmins.lan   Ready    <none>          12m   v1.29.6   192.168.0.24   <none>        Rocky Linux 9.4 (Blue Onyx)   5.14.0-427.20.1.el9_4.x86_64   cri-o://1.31.0
k8swor2.linuxsysadmins.lan   Ready    <none>          10m   v1.29.6   192.168.0.25   <none>        Rocky Linux 9.4 (Blue Onyx)   5.14.0-427.20.1.el9_4.x86_64   cri-o://1.31.0
k8swor3.linuxsysadmins.lan   Ready    <none>          10m   v1.29.6   192.168.0.26   <none>        Rocky Linux 9.4 (Blue Onyx)   5.14.0-427.20.1.el9_4.x86_64   cri-o://1.31.0
[ansible@k8smas1 ~]$
Setup Kubectl autoComplete
When running kubectl command use TAB TAB to list all the available options, to enable this feature we need to allow the autocompletion
$ source <(kubectl completion bash)
$ kubectl completion bash > ~/.kube/completion.bash.inc
$ printf "
  # kubectl shell completion
  source '$HOME/.kube/completion.bash.inc'
  " >> $HOME/.bash_profile
$ source $HOME/.bash_profile
Create a Pod Network
Now we should deploy a pod network for the cluster, I’m going with Calico.
Download the latest YAML file from official calico site and create the pod network.
# wget https://docs.projectcalico.org/manifests/calico.yaml
# kubectl apply -f calico.yaml
We should see calico run on each nodes
[ansible@k8smas1 ~]$ kubectl get pods -n kube-system
NAME                                                 READY   STATUS    RESTARTS       AGE
calico-kube-controllers-658d97c59c-9pcwd             1/1     Running   1              7h41m
calico-node-5f6f7                                    1/1     Running   1              7h41m
calico-node-67sqg                                    1/1     Running   1              7h41m
calico-node-pq79q                                    1/1     Running   1              7h41m
calico-node-vcxp9                                    1/1     Running   1              7h41m
calico-node-wztvt                                    1/1     Running   1              7h41m
calico-node-zbncg                                    1/1     Running   1              7h41m
coredns-76f75df574-s7hks                             1/1     Running   1              7h52m
coredns-76f75df574-wt857                             1/1     Running   1              7h52m
etcd-k8smas1.linuxsysadmins.lan                      1/1     Running   9              7h52m
etcd-k8smas2.linuxsysadmins.lan                      1/1     Running   1              7h47m
etcd-k8smas3.linuxsysadmins.lan                      1/1     Running   1              7h45m
kube-apiserver-k8smas1.linuxsysadmins.lan            1/1     Running   10 (95m ago)   7h52m
kube-apiserver-k8smas2.linuxsysadmins.lan            1/1     Running   1              7h47m
kube-apiserver-k8smas3.linuxsysadmins.lan            1/1     Running   1              7h45m
kube-controller-manager-k8smas1.linuxsysadmins.lan   1/1     Running   9              7h52m
kube-controller-manager-k8smas2.linuxsysadmins.lan   1/1     Running   1              7h47m
kube-controller-manager-k8smas3.linuxsysadmins.lan   1/1     Running   1              7h45m
kube-proxy-24wnz                                     1/1     Running   1              7h45m
kube-proxy-8kjlv                                     1/1     Running   1              7h45m
kube-proxy-fpq9g                                     1/1     Running   1              7h43m
kube-proxy-jl5zv                                     1/1     Running   1              7h52m
kube-proxy-k9gvx                                     1/1     Running   1              7h43m
kube-proxy-krm24                                     1/1     Running   1              7h47m
kube-scheduler-k8smas1.linuxsysadmins.lan            1/1     Running   9              7h52m
kube-scheduler-k8smas2.linuxsysadmins.lan            1/1     Running   1              7h47m
kube-scheduler-k8smas3.linuxsysadmins.lan            1/1     Running   1              7h45m
[ansible@k8smas1 ~]$
Test the App deployment
To wrap up, deploy a web server using imperative command with options.
[ansible@k8smas1 ~]$ kubectl create namespace webserver
namespace/webserver created
[ansible@k8smas1 ~]$

[ansible@k8smas1 ~]$ kubectl get namespaces
NAME              STATUS   AGE
default           Active   8h
kube-node-lease   Active   8h
kube-public       Active   8h
kube-system       Active   8h
webserver         Active   6s
[ansible@k8smas1 ~]$

[ansible@k8smas1 ~]$ kubectl create deployment webserver --image nginx --replicas 3 --namespace webserver
deployment.apps/webserver created
[ansible@k8smas1 ~]$

[ansible@k8smas1 ~]$ kubectl get deployments.apps -n webserver
NAME        READY   UP-TO-DATE   AVAILABLE   AGE
webserver   3/3     3            3           18s
[ansible@k8smas1 ~]$

[ansible@k8smas1 ~]$ kubectl get pods -n webserver -o wide
NAME                         READY   STATUS    RESTARTS   AGE     IP               NODE                         NOMINATED NODE   READINESS GATES
webserver-667ddc69b6-hbkjc   1/1     Running   0          6m38s   172.16.99.133    k8swor1.linuxsysadmins.lan   <none>           <none>
webserver-667ddc69b6-hjkgp   1/1     Running   0          6m38s   172.16.39.196    k8swor2.linuxsysadmins.lan   <none>           <none>
webserver-667ddc69b6-jk2ds   1/1     Running   0          6m38s   172.16.202.196   k8swor3.linuxsysadmins.lan   <none>           <none>
[ansible@k8smas1 ~]$

[ansible@k8smas1 ~]$ kubectl logs -n webserver deployments/webserver
Found 3 pods, using pod/webserver-667ddc69b6-jk2ds
/docker-entrypoint.sh: /docker-entrypoint.d/ is not empty, will attempt to perform configuration
/docker-entrypoint.sh: Looking for shell scripts in /docker-entrypoint.d/
/docker-entrypoint.sh: Launching /docker-entrypoint.d/10-listen-on-ipv6-by-default.sh
10-listen-on-ipv6-by-default.sh: info: Getting the checksum of /etc/nginx/conf.d/default.conf
10-listen-on-ipv6-by-default.sh: info: Enabled listen on IPv6 in /etc/nginx/conf.d/default.conf
/docker-entrypoint.sh: Sourcing /docker-entrypoint.d/15-local-resolvers.envsh
/docker-entrypoint.sh: Launching /docker-entrypoint.d/20-envsubst-on-templates.sh
/docker-entrypoint.sh: Launching /docker-entrypoint.d/30-tune-worker-processes.sh
/docker-entrypoint.sh: Configuration complete; ready for start up
2024/06/18 08:30:37 [notice] 1#1: using the "epoll" event method
2024/06/18 08:30:37 [notice] 1#1: nginx/1.27.0
2024/06/18 08:30:37 [notice] 1#1: built by gcc 12.2.0 (Debian 12.2.0-14)
2024/06/18 08:30:37 [notice] 1#1: OS: Linux 5.14.0-427.20.1.el9_4.x86_64
2024/06/18 08:30:37 [notice] 1#1: getrlimit(RLIMIT_NOFILE): 1048576:1048576
2024/06/18 08:30:37 [notice] 1#1: start worker processes
2024/06/18 08:30:37 [notice] 1#1: start worker process 24
2024/06/18 08:30:37 [notice] 1#1: start worker process 25
2024/06/18 08:30:37 [notice] 1#1: start worker process 26
2024/06/18 08:30:37 [notice] 1#1: start worker process 27
2024/06/18 08:30:37 [notice] 1#1: start worker process 28
2024/06/18 08:30:37 [notice] 1#1: start worker process 29
2024/06/18 08:30:37 [notice] 1#1: start worker process 30
2024/06/18 08:30:37 [notice] 1#1: start worker process 31
[ansible@k8smas1 ~]$
That’s it we are done with setting up a Highly available Kubernetes cluster on Rocky Linux 9.4 with CRI-O as our container runtime.