The spacewalk is an open source software under the GPLv2 licence, which helps for system management with great features like lifecycle management, audit and provisioning which provided by RedHat.
Latest version 2.8 released on April 2018. The initial release of Spacewalk came out by June 2008, It been 10 years as of now RedHat providing with an opensource version alternative to Satellite server with limited features. The current released version of the spacewalk will support PostgreSQL 10. We can manage maximum 20,000 clients using Spacewalk.
The Spacewalk can be installed in RedHat Enterprise Linux 6 or 7, Fedora 26 or 27 and support in similar variants like CentOS, Oracle Linux, Scientific Linux. Oracle has their own customised Spacewalk 2.7 server version through yum public repository. For Suse users, they have their customized spacewalk version in the name of Suse Manager. Currently, in a separate project, they have forked spacewalk in the name of Uyuni.
In this guide, we are about to use with CentOS Linux 7.5. Moreover, to have a database server we are using with the opensource database PostgreSQL which embedded in Spacewalk installation.
How Can Spacewalk be used?
- To manage a lifecycle (Install and update software) of Linux servers in large number.
- To get an Inventory of our systems which provide with hardware & software information.
- Any changes to configuration files in Linux environment.
- To serve with custom software packages to the clients.
- Provision with the virtual and physical system using kickstart installation.
- To start or stop any virtual servers.
- Auditing Linux servers using opensource auditing tool OpenSCAP.
System Requirements:
A fresh installation of CentOS Linux 7.5.
Minimum 2GB of RAM, Recommended 4GB RAM.
6GB of disk space recommended per channel, Adding additional channels & clients required more space.
Need to have a Mount point in the name of /var/satellite, Strictly LVM filesystem.
To perform a successful installation we need to have minimum 12GB under /var mount point.
Ports required for Spacewalk server:
80/TCP, 443/tcp ports for Outbound traffic.
80/TCP, 443/tcp ports for Inbound traffic.
53/TCP/UDP for DNS and 69 for PXE provisioning using TFTP.
5222/TCP port with inbound traffic to push actions towards client machines.
5269/TCP port for inbound traffic to enable with proxy push actions.
389/TCP and 636/TCP for LDAP authentication and integration.
More Spacewalk related topics are as follows:
- How to create Software channels, Repos, Activation keys & sync in Spacewalk Server 2.8
- How to install and register Linux clients with Spacewalk server 2.8.
Note:> We will cover with Installing and configuring in both RHEL 6 and 7 based installation. All RHEL based Linux variants like CentOS, Oracle, Scientific can follow this guide.
Set Hostname:
Hostname needs to be resolved with both forward and reverse lookup. We have a DNS server (192.168.107.222) for the same. If you have one use it, else configure with localhost entry in /etc/hosts.
# ip a | grep inet | grep -v inet6
# host spacewalk.oel7.local; hostnamectl status
We have defined with a dedicated mount point for /var/satellite. In our guide, while installation we allocated with below layout.
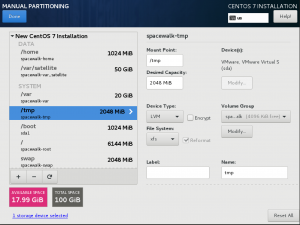
After installing with the Operating system we need to get one like below.
[root@spacewalk ~]# df -hP /var/satellite
Filesystem Size Used Avail Use% Mounted on
/dev/mapper/centos-var_satellite 50G 33M 50G 1% /var/satellite
[root@spacewalk ~]#
SELinux Setup:
Enable SELinux in enforcing mode, If you have any challenge during installation make SELinux in permissive mode by running “setenforce 0”.
# sestatus

[root@spacewalk ~]# sestatus
SELinux status: enabled
SELinuxfs mount: /sys/fs/selinux
SELinux root directory: /etc/selinux
Loaded policy name: targeted
Current mode: enforcing
Mode from config file: enforcing
Policy MLS status: enabled
Policy deny_unknown status: allowed
Max kernel policy version: 31
[root@spacewalk ~]#
Add with Firewall rules for RHEL 7 Servers:
To add with firewall rules we are making a copy of existing firewalld service RH-Satellite-6 and modified to our requirement.
# cp -p /usr/lib/firewalld/services/RH-Satellite-6.xml /usr/lib/firewalld/services/spacewalk-28.xml

# vi /usr/lib/firewalld/services/spacewalk-28.xml
Replace the content with below
<?xml version="1.0" encoding="utf-8"?>
<service>
<short>Spacewalk Server 2.8</short>
<description>Spacewalk Server 2.8 is a systems management server that can be used to configure new systems, subscribe to updates, and maintain installations in distributed environments.</description>
<port protocol="tcp" port="53"/>
<port protocol="udp" port="53"/>
<port protocol="udp" port="67-69"/>
<port protocol="tcp" port="80"/>
<port protocol="tcp" port="443"/>
<port protocol="tcp" port="5222"/>
<port protocol="tcp" port="5269"/>
<port protocol="tcp" port="389"/>
<port protocol="tcp" port="636"/>
</service>
Save and exit using wq!
Once we add the spacewalk firewalld service make sure to reload firewalld.
# firewall-cmd --reload
Verify our added “spacewalk-28” service by listing available firewalld services.
# firewall-cmd --get-services
Now let us add the spacewalk firewalld service and make it permanent, By following verify to confirm the newly added firewalld service.
# firewall-cmd --add-service=spacewalk-28 --permanent
# firewall-cmd --reload
# firewall-cmd --list-all
Add with Firewall rules for RHEL 6 Servers:
# iptables -D INPUT -j REJECT --reject-with icmp-host-prohibited
# iptables -I INPUT -p udp -m udp --dport 69 -j ACCEPT
# iptables -I INPUT -p tcp -m state --state NEW -m tcp --dport 80 -j ACCEPT
# iptables -I INPUT -p tcp -m state --state NEW -m tcp --dport 443 -j ACCEPT
# iptables -I INPUT -p tcp -m state --state NEW -m tcp --dport 5222 -j ACCEPT
# iptables -I INPUT -p tcp -m state --state NEW -m tcp --dport 5269 -j ACCEPT
# iptables -I INPUT -p tcp -m tcp --dport 389 -m state --state NEW,ESTABLISHED -j ACCEPT
# iptables -I INPUT -p udp -m udp --dport 389 -m state --state NEW,ESTABLISHED -j ACCEPT
# iptables -I INPUT -p tcp -m tcp --dport 636 -m state --state NEW,ESTABLISHED -j ACCEPT
# iptables -I INPUT -p udp -m udp --dport 636 -m state --state NEW,ESTABLISHED -j ACCEPT
# iptables -I OUTPUT -p tcp -m state --state NEW -m tcp --dport 80 -j ACCEPT
# iptables -I OUTPUT -p tcp -m state --state NEW -m tcp --dport 443 -j ACCEPT
# iptables -A INPUT -j REJECT --reject-with icmp-host-prohibited
Save the rules and restart the iptables service.
# service iptables save
# service iptables restart
List and verify by running
# iptables -L -n -v
Before starting with Spacewalk installation make sure to update the server with latest patches. And install with few required basic packages.
# yum install net-tool bind-utils vim wget xinted -y
# yum update -y
By following add with Spacewalk, Java and dependencies repositories.
RHEL 6 based Installation:
# rpm -Uvh https://copr-be.cloud.fedoraproject.org/results/@spacewalkproject/spacewalk-2.8/epel-6-x86_64/00736372-spacewalk-repo/spacewalk-repo-2.8-11.el6.noarch.rpm
# rpm -Uvh https://dl.fedoraproject.org/pub/epel/epel-release-latest-6.noarch.rpm
# cd /etc/yum.repos.d && curl -O https://copr.fedorainfracloud.org/coprs/g/spacewalkproject/java-packages/repo/epel-7/group_spacewalkproject-java-packages-epel-7.repo
# cd /etc/yum.repos.d && curl -O https://copr.fedorainfracloud.org/coprs/g/spacewalkproject/epel6-addons/repo/epel-6/group_spacewalkproject-epel6-addons-epel-6.repo
RHEL 7 based installation:
# rpm -Uvh https://copr-be.cloud.fedoraproject.org/results/@spacewalkproject/spacewalk-2.8/epel-7-x86_64/00736372-spacewalk-repo/spacewalk-repo-2.8-11.el7.centos.noarch.rpm
# rpm -Uvh https://dl.fedoraproject.org/pub/epel/epel-release-latest-7.noarch.rpm
# cd /etc/yum.repos.d && curl -O https://copr.fedorainfracloud.org/coprs/g/spacewalkproject/java-packages/repo/epel-7/group_spacewalkproject-java-packages-epel-7.repo
Repo added output:
[root@spacewalk ~]# rpm -Uvh https://copr-be.cloud.fedoraproject.org/results/@spacewalkproject/spacewalk-2.8/epel-7-x86_64/00736372-spacewalk-repo/spacewalk-repo-2.8-11.el7.centos.noarch.rpm
Retrieving https://copr-be.cloud.fedoraproject.org/results/@spacewalkproject/spacewalk-2.8/epel-7-x86_64/00736372-spacewalk-repo/spacewalk-repo-2.8-11.el7.centos.noarch.rpm
warning: /var/tmp/rpm-tmp.veARSB: Header V3 RSA/SHA1 Signature, key ID bad596d6: NOKEY
Preparing... ################################# [100%]
Updating / installing...
1:spacewalk-repo-2.8-11.el7.centos ################################# [100%]
[root@spacewalk ~]# rpm -Uvh https://dl.fedoraproject.org/pub/epel/epel-release-latest-7.noarch.rpm
Retrieving https://dl.fedoraproject.org/pub/epel/epel-release-latest-7.noarch.rpm
warning: /var/tmp/rpm-tmp.NefOZb: Header V3 RSA/SHA256 Signature, key ID 352c64e5: NOKEY
Preparing... ################################# [100%]
Updating / installing...
1:epel-release-7-11 ################################# [100%]
[root@spacewalk ~]# cd /etc/yum.repos.d && curl -O https://copr.fedorainfracloud.org/coprs/g/spacewalkproject/java-packages/repo/epel-7/group_spacewalkproject-java-packages-epel-7.repo
% Total % Received % Xferd Average Speed Time Time Time Current
Dload Upload Total Spent Left Speed
100 395 100 395 0 0 31 0 0:00:12 0:00:12 --:--:-- 125
[root@spacewalk yum.repos.d]#
Start installing with Spacewalk core packages, PostgreSQL-setup and dependencies:
# yum install spacewalk-setup-postgresql -y
# yum install spacewalk-postgresql -y
Package installed sample output:
Installed:
spacewalk-postgresql.noarch 0:2.8.2-1.el7.centos

Dependency Installed:
OpenIPMI-modalias.x86_64 0:2.0.23-2.el7 PyPAM.x86_64 0:0.5.0-19.el7
PyYAML.x86_64 0:3.10-11.el7 ace-editor.noarch 0:1.1.3-4.el7.centos
aether-api.noarch 0:1.13.1-13.el7 aether-connector-wagon.noarch 0:1.13.1-13.el7
aether-impl.noarch 0:1.13.1-13.el aether-spi.noarch 0:1.13.1-13.el7
aether-util.noarch 0:1.13.1-13.el7 ant.noarch 0:1.9.2-9.el7
Long output truncated.
Before starting with installation we need to initialize with PostgreSQL DB. To complete with an error-free installation make sure to add below locale settings and run PostgreSQL init with en_US.utf8 locale support.
# vi /etc/environment
LANG=en_US.utf-8
LC_ALL=en_US.utf-8

# LANG=en_US.utf8 postgresql-setup initdb
Setup Spacewalk after RPM installation:
Run with spacewalk setup command and by following provide with required information like email ID, SSL certificate password. If you planning to use provisioning enable with TFTP server by providing “y” while prompts.
# spacewalk-setup
The output of the Spacewalk setup command:
[root@spacewalk ~]# spacewalk-setup
* Setting up SELinux..
** Database: Setting up database connection for PostgreSQL backend.
Database "rhnschema" does not exist
** Database: Installing the database:
** Database: This is a long process that is logged in:
** Database: /var/log/rhn/install_db.log
*** Progress: #
** Database: Installation complete.
** Database: Populating database.
*** Progress: ##########################
* Configuring tomcat.
* Setting up users and groups.
** GPG: Initializing GPG and importing key.
** GPG: Creating /root/.gnupg directory
You must enter an email address.
Admin Email Address? oeladmin@spacewalk.oel7.local
* Performing initial configuration.
* Configuring apache SSL virtual host.
Should setup configure apache's default ssl server for you (saves original ssl.conf) [Y]? Y
** /etc/httpd/conf.d/ssl.conf has been backed up to ssl.conf-swsave
* Configuring jabberd.
* Creating SSL certificates.
CA certificate password?
Re-enter CA certificate password?
Cname alias of the machine (comma seperated)? space
Organization? OEL7
Organization Unit [spacewalk.oel7.local]? Unix
Email Address [oeladmin@spacewalk.oel7.local]?
City? CH
State? TN
Country code (Examples: "US", "JP", "IN", or type "?" to see a list)? IN
** SSL: Generating CA certificate.
** SSL: Deploying CA certificate.
** SSL: Generating server certificate.
** SSL: Storing SSL certificates.
* Deploying configuration files.
* Update configuration in database.
* Setting up Cobbler..
Cobbler requires tftp and xinetd services be turned on for PXE provisioning functionality. Enable these services [Y]? Y
* Restarting services.
Installation complete.
Visit https://spacewalk.oel7.local to create the Spacewalk administrator account.
[root@spacewalk ~]#
Spacewalk service can be managed using available stop, start and restart options.
# /usr/sbin/spacewalk-service start
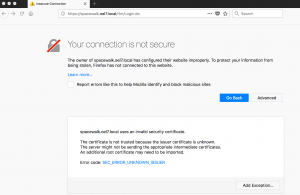
Once done with installation open any one of web browser and navigate to spacewalk URL.
https://spacewalk.oel7.local
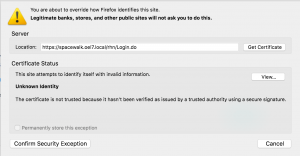
We will get “Your connection is not secure” alert. Click on advance and click “Add Exception” to load the certificate from spacewalk web server.
Click “Get Certificate” and “Confirm security exception” to load the Spacewalk user creation page.
It will prompt to create with an administrator account and “Organization”, In our guide, we are about to use with “oeladmin” as an administrator account. Choose your “Organization” name admin account password and click “Create Organization”.
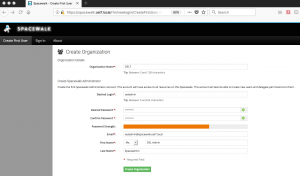
We will be taken to the “Overview” page after the Organization and admin account created.

Logout and re-login to verify the admin account credentials.
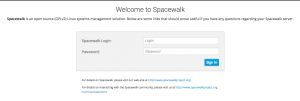
That’s it, we completed the spacewalk setup.
Conclusion:
We have successfully installed and configured an OpenSource Linux system management solution for free of cost. The spacewalk has the capability to handle small to a large number of clients. It has a lot of great features towards managing Linux environment by automating our infrastructure by finding and eliminating security compliance, fixing with security vulnerabilities, auditing, System currency reports and provisioning.
In our upcoming topics, we will cover how to create Channels, Repositories, Sync etc. Provide your feedback in below comment section, your valuable feedbacks are most welcome.