Introduction
Setting up HAProxy for Kubernetes high availability involves configuring HAProxy as a load balancer to distribute incoming traffic across multiple Kubernetes control plane nodes. HAProxy ensures redundancy and fault tolerance by directing requests to healthy nodes, thereby enhancing the availability and reliability of the Kubernetes cluster. This setup optimizes resource utilization and ensures continuous operation even if individual nodes experience failures, thereby supporting seamless scaling and robust performance for containerized applications.
If you are looking to set up a Kubernetes Cluster on your favourite distro, refer below internal URLs
- Creating Highly Available Clusters with kubeadm on Rocky Linux 9.4
- Install Kubernetes Cluster on Ubuntu 22.04 LTS using kubeadm
- Install Kubernetes Cluster with Ansible on Ubuntu in 5 minutes
- How to Install a Kubernetes on CentOS 7
- Upgrade Kubernetes Cluster with zero downtime in 5 easy steps
- Create a Rolling Update Kubernetes Deployment in 3 ways
Setting up HAProxy
Set the hostname
# hostnamectl set-hostname haproxy.linuxsysadmins.lanInstall the package to configure the HAProxy
# dnf install haproxy -yMake sure to backup the original configuration prior to the changes.
# cp /etc/haproxy/haproxy.cfg /etc/haproxy/haproxy.cfg-originalWe have defined status to check the traffic, frontend and backend for the Kubernetes HA setup.
#---------------------------------------------------------------------
# Global settings
#---------------------------------------------------------------------
global
    log         127.0.0.1 local2

    chroot      /var/lib/haproxy
    pidfile     /var/run/haproxy.pid
    maxconn     4000
    user        haproxy
    group       haproxy
    daemon

    # turn on stats unix socket
    stats socket /var/lib/haproxy/stats

    # utilize system-wide crypto-policies
    ssl-default-bind-ciphers PROFILE=SYSTEM
    ssl-default-server-ciphers PROFILE=SYSTEM

#---------------------------------------------------------------------
# common defaults that all the 'listen' and 'backend' sections will
# use if not designated in their block
#---------------------------------------------------------------------
defaults
    mode                    http
    log                     global
    option                  dontlognull
    option http-server-close
    option                  redispatch
    retries                 3
    timeout http-request    10s
    timeout queue           1m
    timeout connect         5000
    timeout client          50000
    timeout server          50000
    timeout http-keep-alive 10s
    timeout check           10s
    maxconn                 3000

# status
listen stats
  bind    *:9000
  mode    http
  stats   enable
  stats   hide-version
  stats   uri       /stats
  stats   refresh   30s
  stats   realm     Haproxy\ Statistics
  stats   auth      admin:haproxypassword
#---------------------------------------------------------------------
# main frontend which proxys to the backends
#---------------------------------------------------------------------
frontend 		kube-apiserver
    bind 		*:6443
    mode 		tcp
    tcp-request 	inspect-delay 5s
    tcp-request content accept if { req.ssl_hello_type 1 }
    default_backend 	kube-apiserver
#---------------------------------------------------------------------
# round robin balancing between the various backends
#---------------------------------------------------------------------
backend 	kube-apiserver
    mode	tcp
    option	tcp-check
    balance	roundrobin
    default-server inter 10s downinter 5s rise 2 fall 2 slowstart 60s maxconn 250 maxqueue 256 weight 100
    server k8smas1 192.168.0.21:6443 check
    server k8smas2 192.168.0.22:6443 check
    server k8smas3 192.168.0.23:6443 check
#---------------------------------------------------------------------
Check for the Syntax error.
# haproxy -c -V -f /etc/haproxy/haproxy.cfgStart and enable the HAProxy service
# systemctl start haproxy.service
# systemctl enable haproxy.service
Incase, if the service failed to start check for the logs and remediate.
# journalctl -xeu haproxy.serviceFirewall Requirement
Allow the traffic out of the box.
# firewall-cmd --add-port={9000,6443}/tcp --permanent
# firewall-cmd --reload
# firewall-cmd --list-all
Service Validation
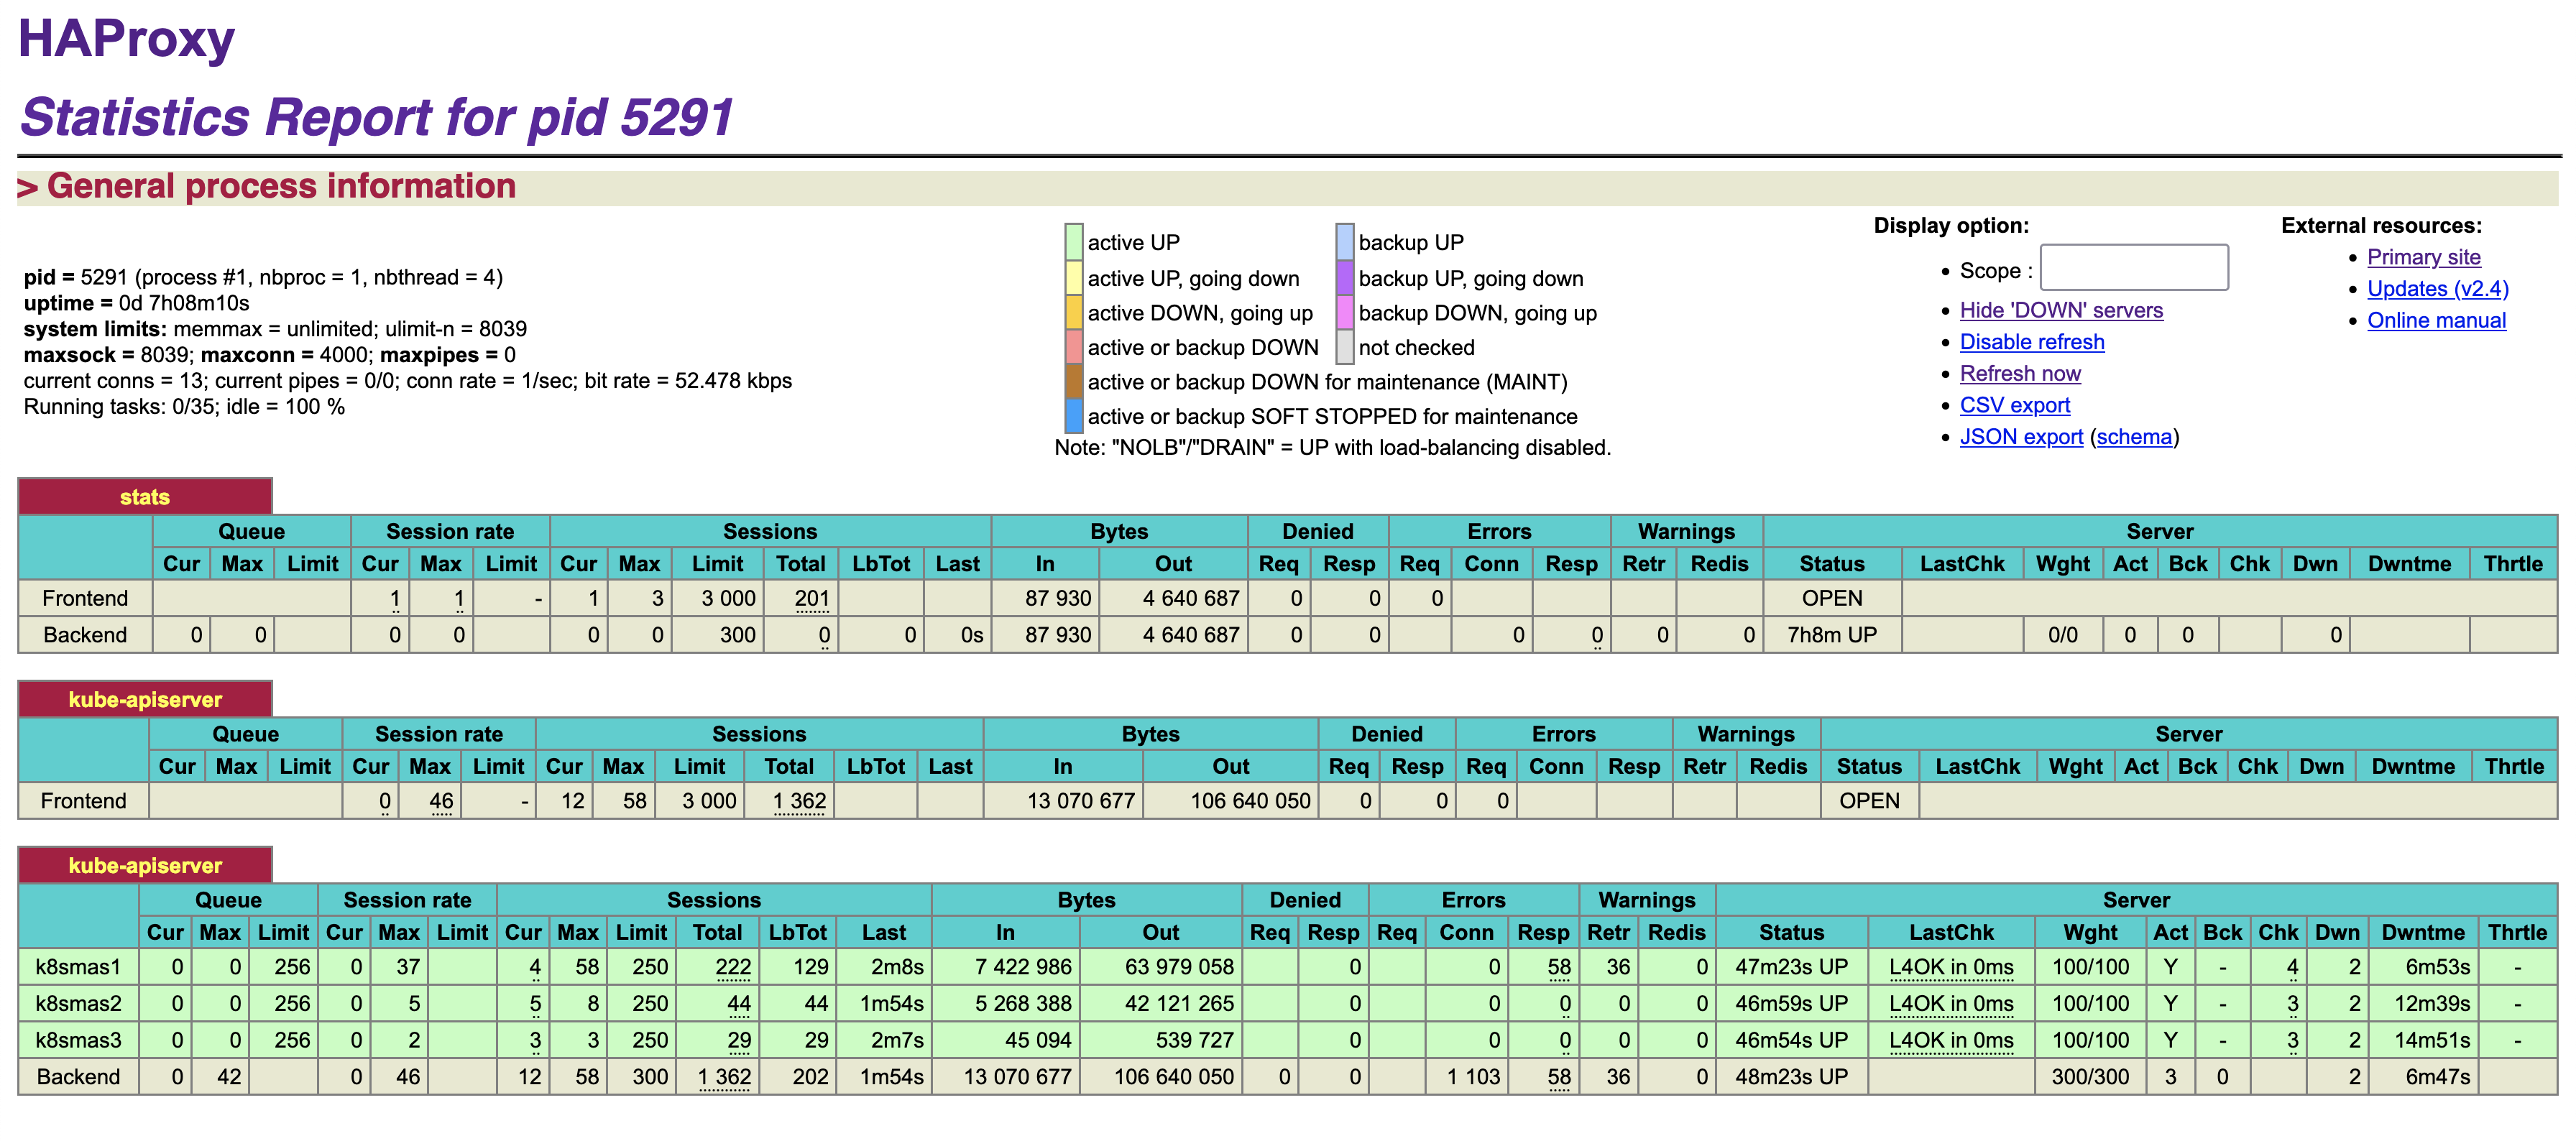
To confirm the status of HAProxy page and Kubernetes API port, do a query as follow.
# ss -tunlp | grep "9000\|6443"The status can be viewed from any web browser by navigating to HAProxy IP.
That’s it, we have completed with setting up a HAProxy Load Balancer for Kubernetes HA setup.