Introduction
In our previous article we have a walkthrough Openfiler installation guide, now let us focus on creating a Software RAID, Volumes, Block devices and sharing them across a network range.
In our testing environment, we are about to use with 4 numbers of 1 TB disks. They will be added as a member into anyone of RAID level.
Read more about Openfiler setup
These are the steps we are about to cover in this guide.
- Creating Partitions on Physical Volumes
- Creating a RAID array
- Checking array status
- Creating Volume group
- Adding New Volumes/Block device from VG
- Access configuration for created Volumes
- Start & Enable iSCSI server Service
- Creating iSCSI Target
- Mapping LUN’s with Target
- Client Side Configuration
Creating Partitions for RAID
To create a partition on physical volume navigate to “Volume” menu and select Software RAID in the right-hand side. Click on “Create new RAID partitions“.
Volume –> Software RAID –> Create new RAID partitions

Each disk is 1 TB in size and they contain 0 partitions right now.
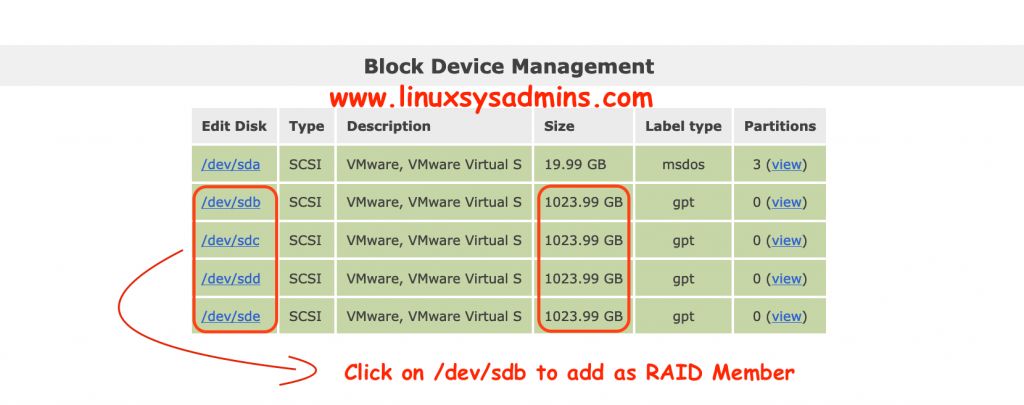
Click on “/dev/
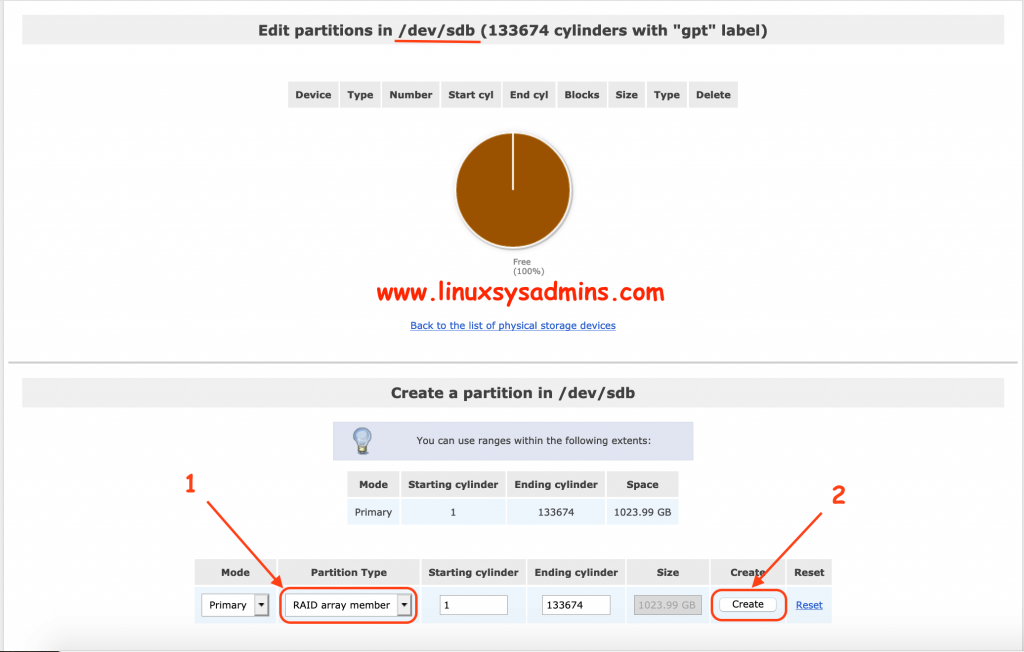
- Choose the partition type as “RAID array member“.
- Click Create to create the partition and adding it to a RAID group.
After creation, the member of RAID will appear in the top. Click “Back to the list of physical storage devices” to follow the same steps for remaining disks.
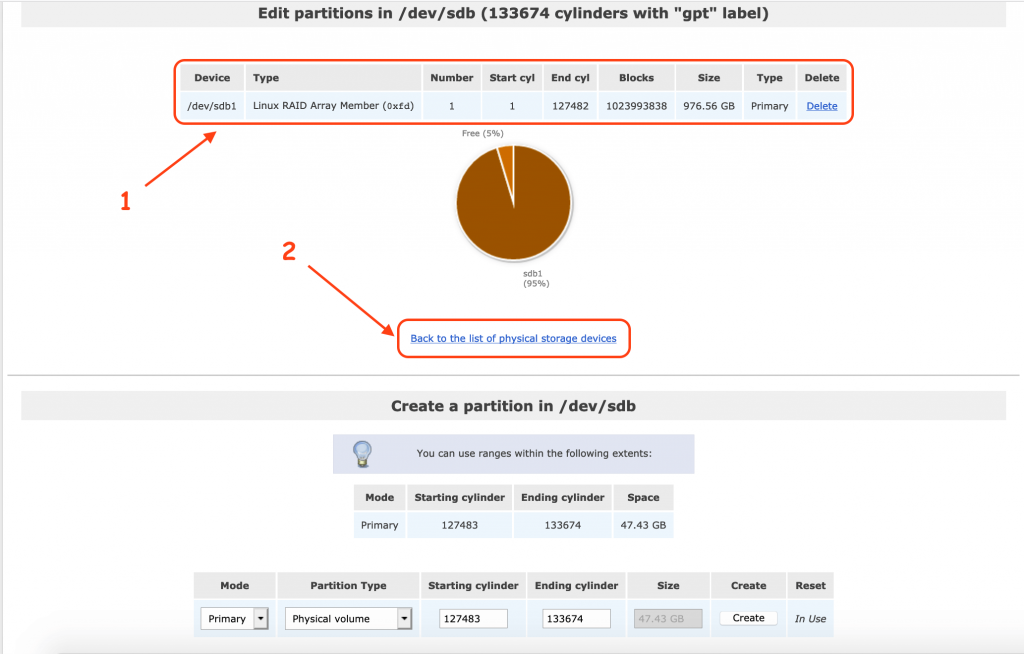
- Created RAID member.
- Click to go back to choose the next disk.
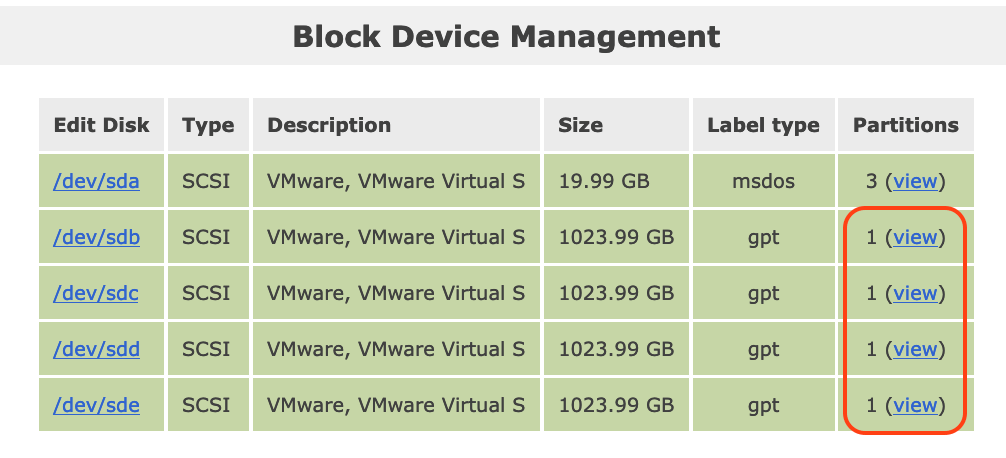
After using all the disks we can notice each disk contain partitions.
Creating a RAID Array
Navigate to Volumes –> Software RAID to create the new RAID Array.
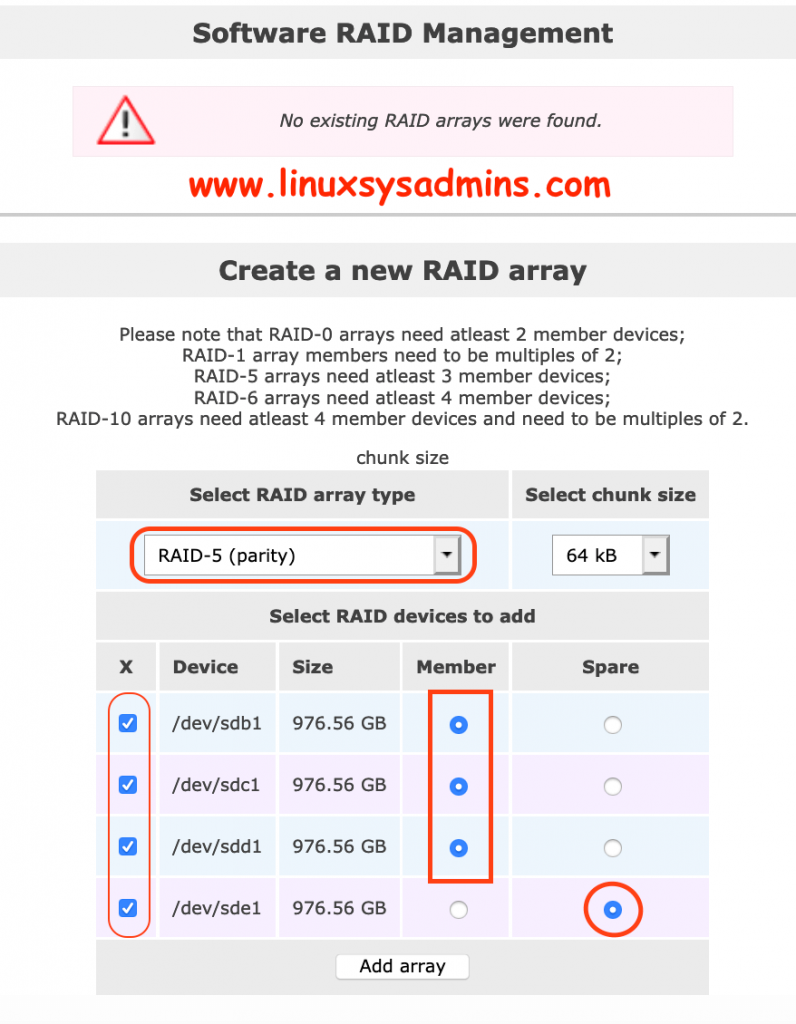
- Select array type as RAID-5
- Chunk size as you wish
- Select all available disk using the checkbox.
- First 3 disks as a member.
- 1 disk as spare.
Click “add array” to create the array.
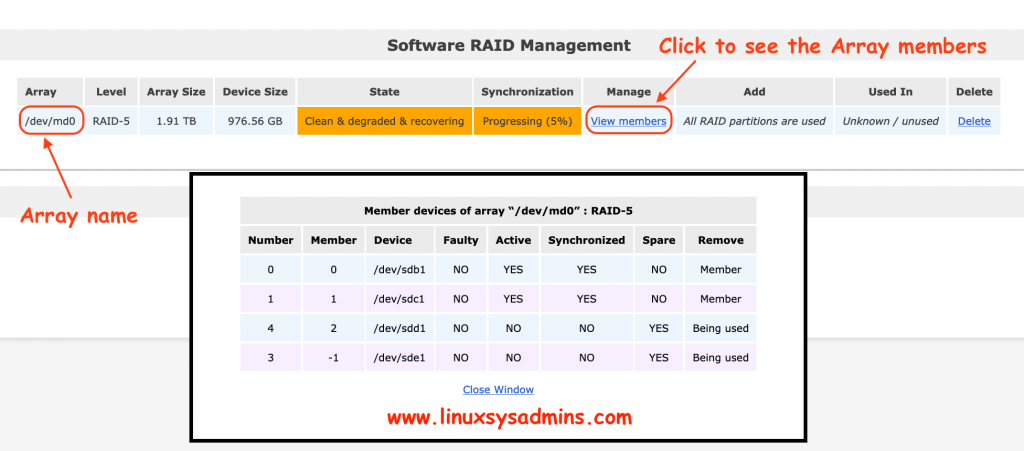
Checking Array Status
Status of the created Raid array and their members.
Creating Volume Group
Now we have a raid device /dev/md0. Let’s create a volume group on top of it.
Volume –> Volume Groups
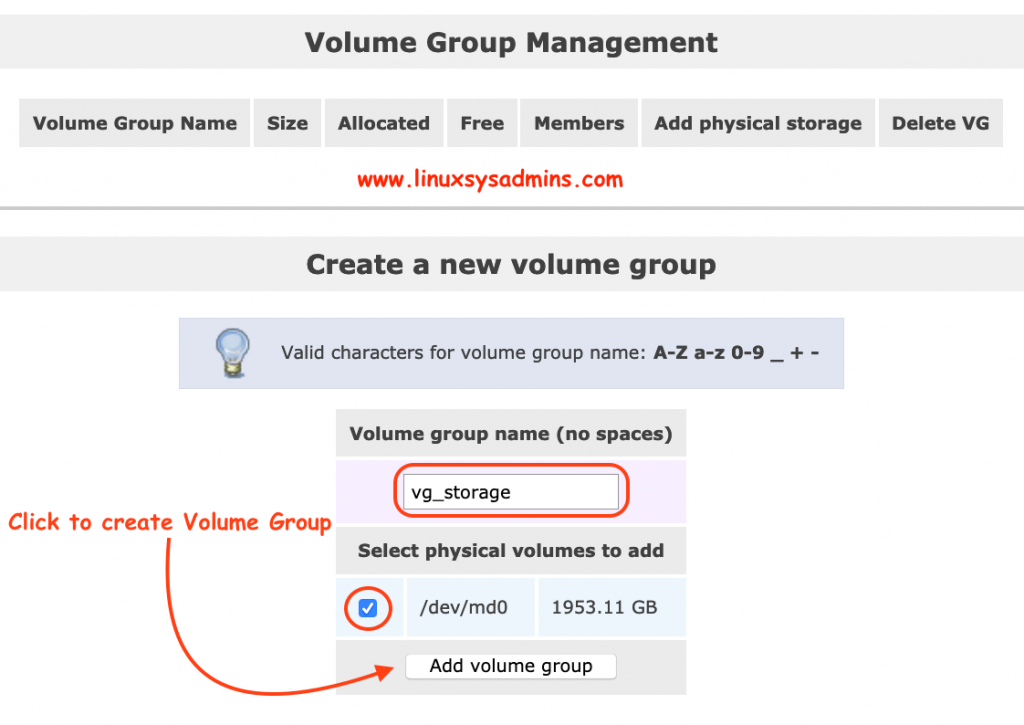
Created Volume group “vg_storage”.

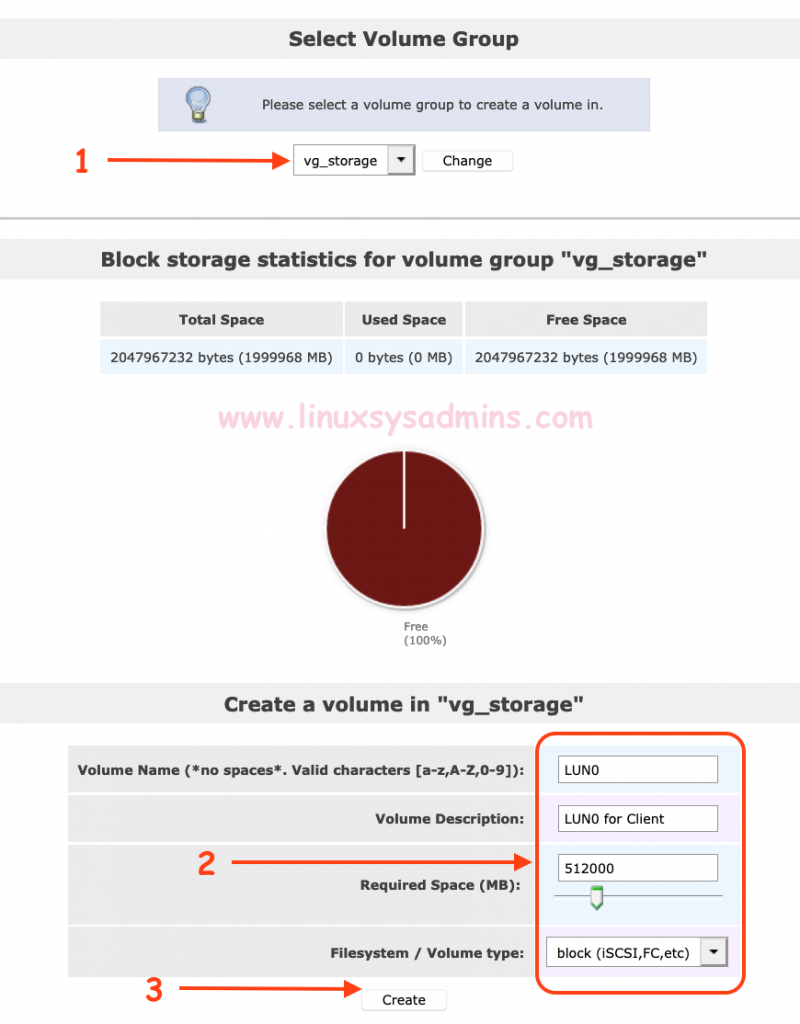
Adding New Volumes/Block device from VG
Volumes –> Right-hand-side –> Add Volume
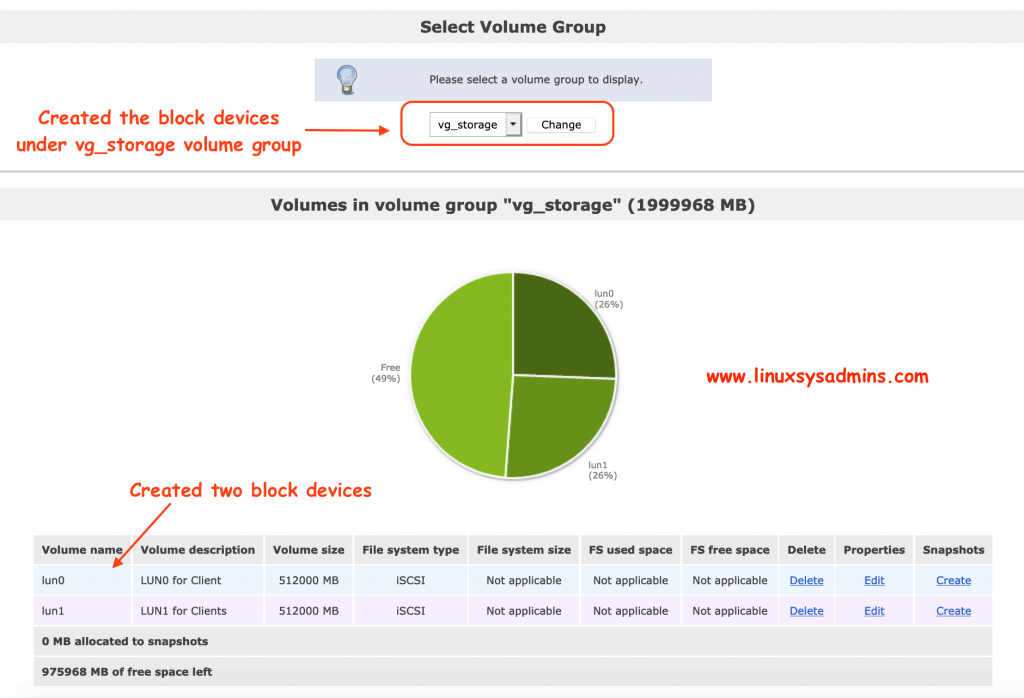
Listed volume group “vg_storage” have enough space to create volumes or filesystem. In our setup, we are about to create with 2 numbers of 500 GB block devices in iSCSI protocol by selecting volume type as “block (iSCSI, FC, etc). Click Create finally to create the block device.
After creating two numbers of block devices.
Access configuration for created Volumes
Only by creating a block device or filesystem we can’t access them from anywhere, to reach them we need to define network range as shown in below picture.
Systems –> At the bottom of the page –> Network Access Configuration
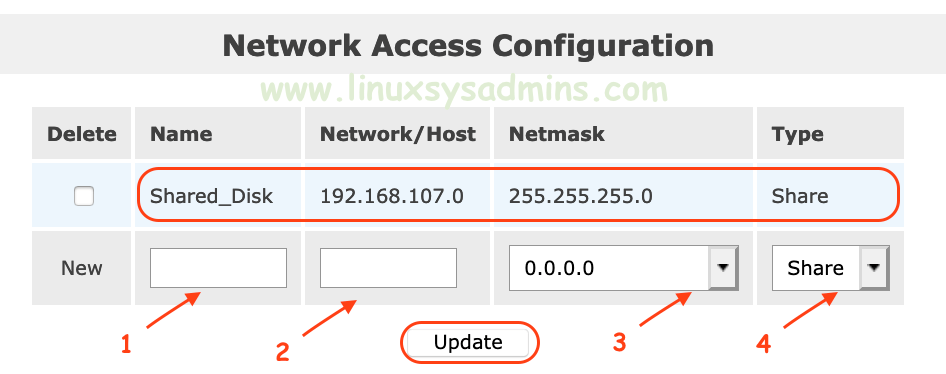
- A unique name for the share
- Network range IP Address
- Subnet the network range
- Whether this Access list defined for a share or UPS.
Click “Update” to save the configuration.
Start & Enable iSCSI server Service
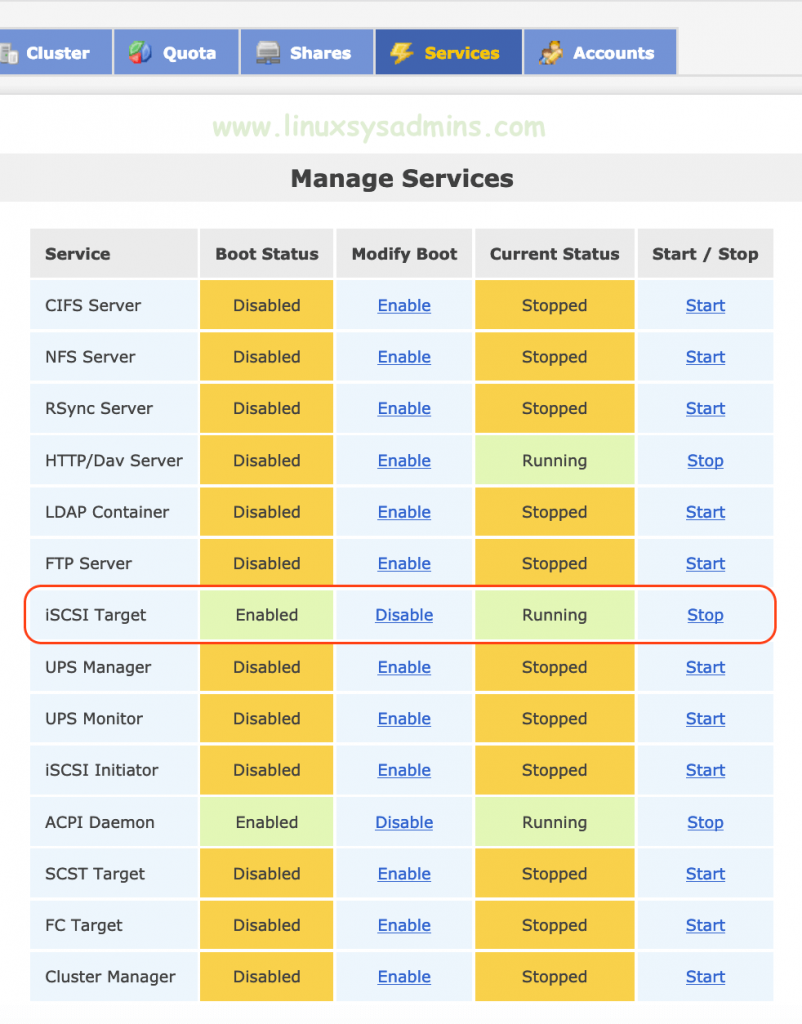
By default iSCSI services are in the stopped state, Our Open filer server now acting as an iSCSI server so we need to start the service and enable it persistently during the reboot.

To Start the service navigate to “Service” from the top menu.
After enabling the service we can notice the state as “Enabled” and “Running“.
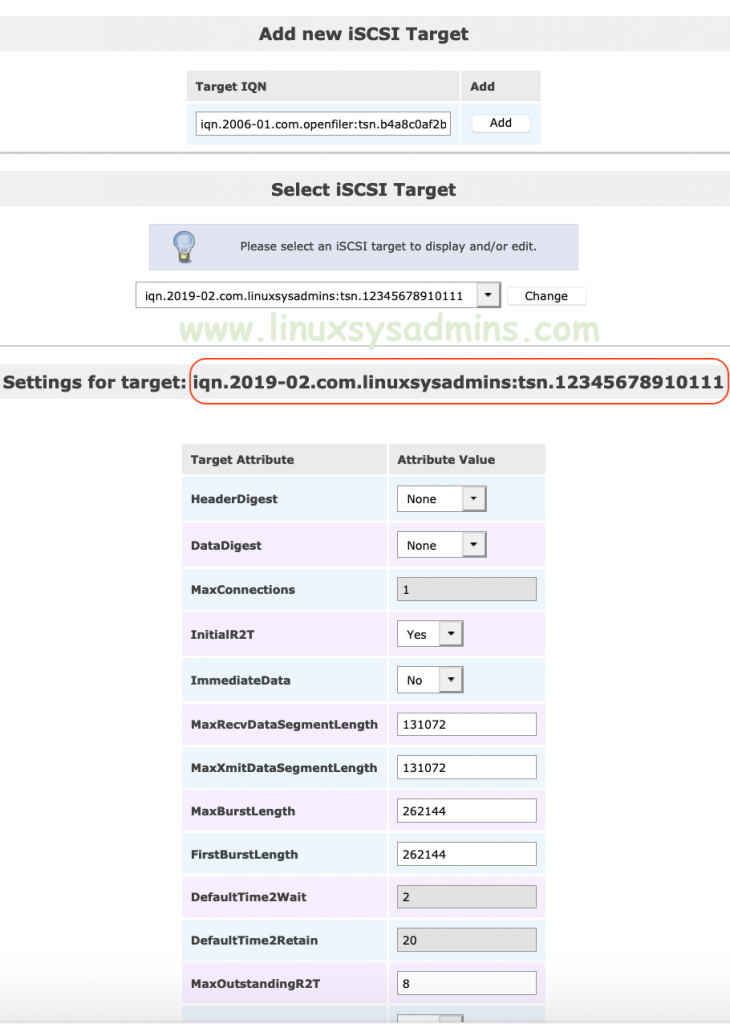
Creating iSCSI Target
To share the block devices we created using the iSCSI protocol is required to add an iSCSI target. Navigate to
Volume –> Right-hand-side –> iSCSI Target –> Sub top Menu –> Target Configuration. Define your own Target IQN. I’m using iqn.2019-02.com.linuxsysadmins:tsn.12345678910111 as my
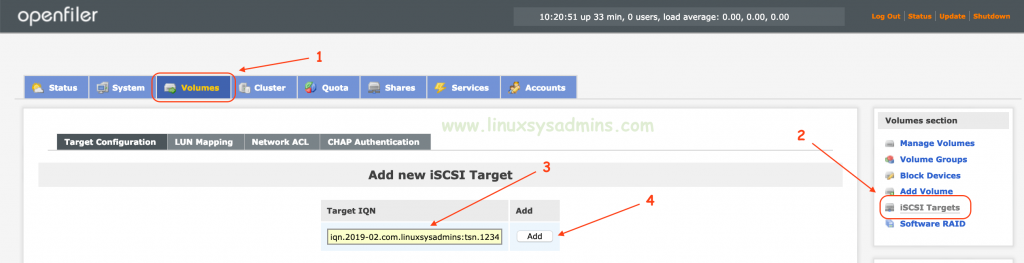
- Click on Volumes
- Select iSCSI Targets
- Define iQN name as you wish
- Click on Add to create the Target.
A created iSCSI Target will list as shown below.
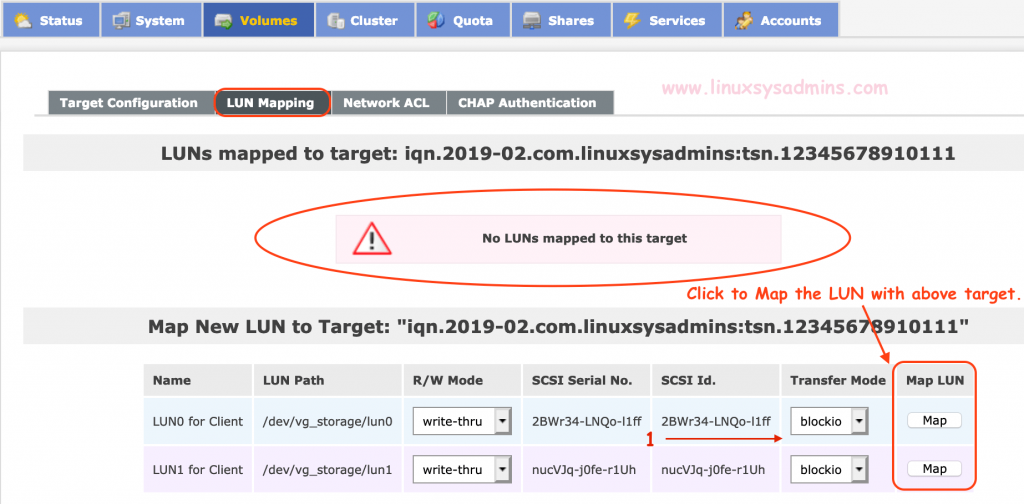
Mapping LUN’s with Target
Once we create with Target other settings will be available, Navigate to next submenu “LUN Mapping” to map the available LUN’s with our created target.
Below figure showing there are 2 LUN’s available for mapping. Click on Map to add it under “iqn.2019-02.com.linuxsysadmins:tsn.12345678910111” target.
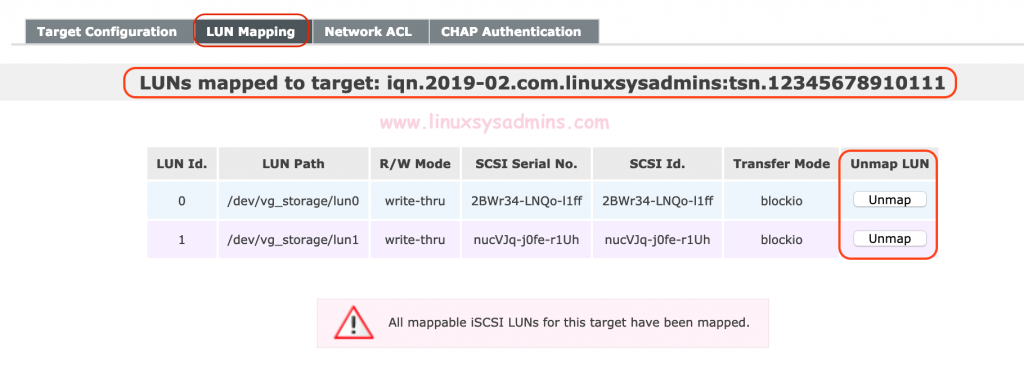
After mapping, it will be listed under the target.
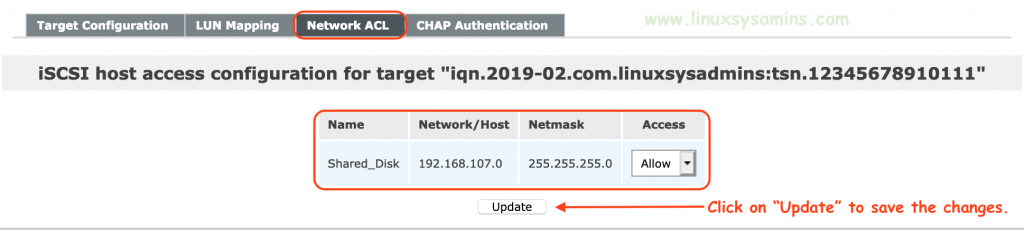
Navigate to next Submenu “Network ACL” to allow the LUN for defined network range by changing the ACL from “Deny” to “Allow” for our target. Click on Update to save the changes.
That’s it we have created and shared a block device from the Openfiler OpenSource storage management system. By following let us see how to get these LUN’s in client servers.
Client Side Configuration
Now let us work on client-side configuration by installing the client package and scan for the iSCSI shared LUN’s.
List and Verify
Before that list the currently available disks.
[root@vcs1 ~]# lsblk
 NAME          MAJ:MIN RM  SIZE RO TYPE MOUNTPOINT
 sda             8:0    0   20G  0 disk
 ├─sda1          8:1    0    1G  0 part /boot
 └─sda2          8:2    0   19G  0 part
   ├─rhel-root 253:0    0   17G  0 lvm  /
   └─rhel-swap 253:1    0    2G  0 lvm  [SWAP]
 sr0            11:0    1  1.7G  0 rom
 sr1            11:1    1  4.2G  0 rom
 [root@vcs1 ~]#

 [root@vcs1 ~]# lsscsi
 [0:0:0:0]    disk    VMware,  VMware Virtual S 1.0   /dev/sda
 [3:0:0:0]    cd/dvd  NECVMWar VMware SATA CD00 1.00  /dev/sr0
 [4:0:0:0]    cd/dvd  NECVMWar VMware SATA CD01 1.00  /dev/sr1
 [root@vcs1 ~]#
Install client package
Begin with installing the client package.
# yum install iscsi-initiator-utils -yDefine Initiator name
If you need to keep your own defined client-side initiator name make changes to below file.
[root@vcs1 ~]# cat /etc/iscsi/initiatorname.iscsi
 InitiatorName=iqn.1994-05.com.redhat:387af62f2ce
 [root@vcs1 ~]#
 [root@vcs1 ~]# vi /etc/iscsi/initiatorname.iscsi
 [root@vcs1 ~]#
 [root@vcs1 ~]# cat /etc/iscsi/initiatorname.iscsi
 InitiatorName=iqn.2019-02.com.vcs1:12345678910
 [root@vcs1 ~]#
Discover and Login iSCSI
Discover the shared LUN from Storage server.
# iscsiadm --mode discoverydb --type sendtargets --portal 192.168.107.110 --discover
Log in to the target.
# iscsiadm --mode node --targetname iqn.2019-02.com.linuxsysadmins:tsn.12345678910111 --portal 192.168.107.110:3260 --login
Check session status
# iscsiadm -m session
# iscsiadm -m node
List the new Disks
Again list the available disks, you should get 2 numbers of the 500GB disk from Openfiler.
[root@vcs1 ~]# lsblk
 NAME          MAJ:MIN RM  SIZE RO TYPE MOUNTPOINT
 sda             8:0    0   20G  0 disk
 ├─sda1          8:1    0    1G  0 part /boot
 └─sda2          8:2    0   19G  0 part
   ├─rhel-root 253:0    0   17G  0 lvm  /
   └─rhel-swap 253:1    0    2G  0 lvm  [SWAP]
 sdb             8:16   0  500G  0 disk
 sdc             8:32   0  500G  0 disk
 sr0            11:0    1  1.7G  0 rom  /mnt
 sr1            11:1    1  4.2G  0 rom  /media
 [root@vcs1 ~]#

 [root@vcs1 ~]# lsscsi
 [0:0:0:0]    disk    VMware,  VMware Virtual S 1.0   /dev/sda
 [3:0:0:0]    cd/dvd  NECVMWar VMware SATA CD00 1.00  /dev/sr0
 [4:0:0:0]    cd/dvd  NECVMWar VMware SATA CD01 1.00  /dev/sr1
 [33:0:0:0]   disk    OPNFILER VIRTUAL-DISK     0     /dev/sdb
 [33:0:0:1]   disk    OPNFILER VIRTUAL-DISK     0     /dev/sdc
 [root@vcs1 ~]#
In case if you need to create a partition and file system on those disks, Follow below article to create the same.
That’s it we have completed with client-side setup and verification.
Conclusion
By creating a volume and sharing from Openfiler we have attached two disks in one of Linux server. The disk can be used for creating filesystem or as fencing device in any required scenario. Let us dive deeper into other article related to Openfiler soon. Subscribe to our newsletters and provide your feedback in the comment section.