Table of Contents
Introduction to Shrink a Volume Group
In our previous article, we have gone through how to extend and reduce a logical volume. Now we will work on how to Shrink a Volume Group with examples. By shrinking a volume group we can remove anyone of underlying physical volumes from the Volume group.

- Create Logical volume management LVM file-system in Linux
- Extend and Reduce LVM Logical Volume Management in Linux
- Shrink a Volume Group in Logical Volume Management (LVM)
- Migrate from single-partition boot device to LVM in CentOS7
Why Shrinking a Volume Group is required?
The requirement can be anything and it depends on the business requirement or it can be revoking unused space from production or non-production serves, few are as follows.
- You may need to set up new VG from the existing un-used space.
- Reduce the number of disks from the Volume group.
- To replace a disk about to die with a warning alarm.
Start with verifying and reducing a volume group.
Preparing for shrinking a Logical Volume
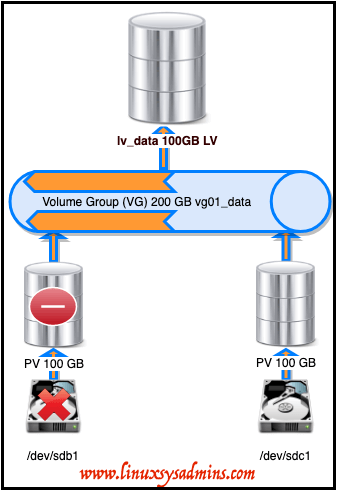
There are two physical volumes 2 X 100 GB “/dev/sdb1 and /dev/sdc1” in our setup. Let’s check the consumed file system.
[root@client1 ~]# df -hP /data/
 Filesystem                     Size  Used Avail Use% Mounted on
 /dev/mapper/vg01_data-lv_data   99G   81G   19G  82% /data
[root@client1 ~]#
At first, unmount the file system. Run “PVS” to find the number of the physical Volumes. By following find the volume group size by running “VGS” and at last list out all the logical volumes.
# umount /data/
# pvs
# vgs
# lvs
The output of “pvs” shows there are two disks used under vg01_data
[root@client1 ~]# pvs
   PV         VG        Fmt  Attr PSize   PFree
   /dev/sda2  centos    lvm2 a--  <19.00g     0
   /dev/sdb1  vg01_data lvm2 a--   99.99g  8.00m
   /dev/sdc1  vg01_data lvm2 a--   99.99g 99.99g
[root@client1 ~]#

[root@client1 ~]# vgs
   VG        #PV #LV #SN Attr   VSize   VFree
   centos      1   2   0 wz--n- <19.00g      0
   vg01_data   2   1   0 wz--n- 199.98g 100.00g
 [root@client1 ~]#

[root@client1 ~]# lvs
   LV      VG        Attr       LSize   Pool Origin Data%  Meta%  Move Log Cpy%Sync Convert
   root    centos    -wi-ao---- <17.00g
   swap    centos    -wi-ao----   2.00g
   lv_data vg01_data -wi-a-----  99.98g
 [root@client1 ~]#
It’s 81 GB used space under /data mount point. So it confirmed one disk is not used. Let’s confirm the same by running the vgs, lvs command with more options to list all consumed devices under the respective VG and LV.
# lvs -o +devices /dev/mapper/vg01_data-lv_data
# vgs -o +devices vg01_data
The output of lvs and vgs command with options.
[root@client1 ~]# lvs -o +devices /dev/mapper/vg01_data-lv_data
   LV      VG        Attr       LSize  Pool Origin Data%  Meta%  Move Log Cpy%Sync Convert Devices
   lv_data vg01_data -wi-a----- 99.98g                                                     /dev/sdb1(0)
[root@client1 ~]#
- -o – The option.
- +devices – listing all consumed devices under VG or LV.
- vg01_data – The Volume group name.
- The number of Physical Volumes used under this vg01_data VG.
- The logical volume under this vg01_data Volume Group.
- The total size of Volume Group.
- Free space in the Volume Group.
- Currently used/consumed device under this VG.
It’s confirmed that /dev/sdb1 is the one and only disk used under vg01_data. It’s safe to reduce the volume group now.
Reduce or Shrink a Volume Group
Start reducing the volume group by removing /dev/sdc1.
# vgreduce vg01_data /dev/sdc1[root@client1 ~]# vgreduce vg01_data /dev/sdc1
Removed "/dev/sdc1" from volume group "vg01_data"
[root@client1 ~]#Once the disk removed, We should see only one PV under vg01_data.
[root@client1 ~]# vgs -o +devices /dev/mapper/vg01_data
   VG        #PV #LV #SN Attr   VSize  VFree Devices
   vg01_data   1   1   0 wz--n- 99.99g 8.00m /dev/sdb1(0)
[root@client1 ~]#
If you need to remove multiple devices from a volume group we can use as follows. Below is an example to remove 5 disks from /dev/sdc1 to /dev/sdg1.
# vgreduce vg01_data /dev/sd[c-g]1Now when you listing “pvs” the /dev/sdc1 will be free from Volume group.
[root@client1 ~]# pvs
   PV         VG        Fmt  Attr PSize    PFree
   /dev/sda2  centos    lvm2 a--   <19.00g       0
   /dev/sdb1  vg01_data lvm2 a--    99.99g    8.00m
   /dev/sdc1            lvm2 ---  <100.00g <100.00g
[root@client1 ~]#
Using the free Physical volume you can create another volume group
# pvremove /dev/sdc1
# pvs
Or remove the PV and Partition completely for any other use.
[root@client1 ~]# pvremove /dev/sdc1
   Labels on physical volume "/dev/sdc1" successfully wiped.
[root@client1 ~]#
[root@client1 ~]# pvs
   PV         VG        Fmt  Attr PSize   PFree
   /dev/sda2  centos    lvm2 a--  <19.00g    0
   /dev/sdb1  vg01_data lvm2 a--   99.99g 8.00m
[root@client1 ~]#
That’s it we can successfully complete with reducing a volume group.
If you are looking for LVM articles follow below link to continue reading the series.
Striped Logical Volume in Logical volume management (LVM)
Conclusion:
Removing Volume group may be required when we plan to reduce the number of disks under logical volume management. Let’s see in the next logical volume management guide until then subscribe to our newsletter and stay with us to receive up-to-date articles.