Table of Contents
Introduction
In this guide, we are about to see how to install a media server using open source software Red5. It comes under the Apache License 2.0. The initial release of Red5 was in 2005 and the latest release of Red5 is (Red5 1.0.9) by June 2017. If you are looking to build a chat server or live streaming video platform Red5 will help to get one.
It supports a variable number of protocols like RTMP, RTMPE, RTMPS which include to stream audio and video formats like FLV, MP4, 3GP, Mp3, M4A, AC. If we are not affordable to pay for Adobe and Wowza the only option it’s better to stick with a Red5 server and live stream videos free of cost. It’s very easy to set up one within a few minutes. By following the below guide you are about to set up a fully functional Red5 Media Server.
Installation server Setup
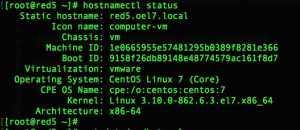
Below is our test environment setup, Set the hostname name and IP to static.
# hostnamectl set-hostname red5.oel7.local
# hostnamectl status
# ip a | grep -i inet | grep -v '127.0\|inet6'

The operating system we are about to use in this guide will be Centos 7.5. By following the same guide you can set up the same in RedHat Enterprise Linux 7.x server, Fedora Linux, Scientific Linux, Oracle Enterprise Linux Server 7.x.
# cat /etc/redhat-release
Update the Server
Before we are starting with Red5 installation let us update our operating system to latest packages.
# yum update -y

Installing Java
By following we required to install with JDK 8 or latest version. Navigate to below URL to start the download by choosing “Accept the Licence Agreement”.
Download with RPM package it may come around 160 MB in Size. Install and verify the version.
# java -version

Download and extract Red5
Once done with Java installation by following we need to set up with Red5. To install with any specific required version, we can navigate to below URL.
In this guide we are using with 1.0.10, Let us download using “wget“.
# wget https://github.com/Red5/red5-server/releases/download/v1.0.10-M9/red5-server-1.0.10-M9.tar.gz

Extract the downloaded tar.gz red5 package under /opt/.
# tar -zxvf red5-server-1.0.10-M9.tar.gz -C /opt/
Add firewalld rules
If we are in a small environment we are required to setup with firewalld rules for Red5 ports.
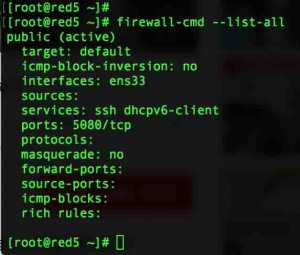
By default, Red5 uses Port 5080. Enable the port and reload the firewalld to take effect for the newly added rule.
# firewall-cmd --add-port=5080/tcp --permanent
# firewall-cmd --reload
# firewall-cmd --list-all


For the confirmation, we can use the “netstat” command to list out the ports.
# netstat -tunlp
Configure Red5 to expose out of the box
To access the Red5 out of the box we required to add Red5 server IP or hostname under below file.
# vi /opt/red5-server/webapps/installer/WEB-INF/red5-web.properties
webapp.virtualHosts=localhost, localhost:5080,192.168.107.243:5080
Save and exit.

Start Red5 Service
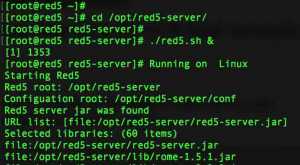
At last, we are good to start the Red5 service by running red5.sh script. If we need to run the service in the background simply add a “&” at the end of the command.
# cd /opt/red5-server/
# ./red5.sh &

Access Red5 test Operation Page from Browser
Open any one of your favourite web browsers with flash support and navigate to Red5 server IP. In this setup, we have used red5.oel7.local or we can use the IP and port 192.169.07.243:5080

Click on “Install a ready-made application” if need to test whether every setup looks fine.

By default, few demo apps will be listed.

Click on any one of App to install with it.

That’s it we have done with a standard installation of Red5 server.
If you face any challenges during setup ask your queries in below comment section. We are happy to assist you.
To download with any previous release versions Click Here to list all available versions.
In case you found any bug or need any improvement suggestion you can raise an issue under Github by the following URL.
That’s it we have completed with installing Red5 media server.
Conclusion
We have seen how to install and configure Media server to stream videos free of cost. Let look into other media server similar to Red5 in a future article. Subscribe to our newsletters and keep yourself updated with our upcoming articles.

Hello, I just installed and configured Red5, but when I surf to 192.xxx.xxx.xxx:5080/installer/ I can not see the list of applications.
Anybody knows what should I do?
Regards!
I am finding a solution for cctv DVR\Camera bandwidth reduction,i got a vague information from one person,there are option to implement streaming video server to lively convert the dvr format live videos from .avi,.cvi to .mp4 as mp4 format have proven to be good quality with less capacity, he said with no detail information lively can convert the .avi format to .mp4 and lively telecast the video,here there will be the reduction and good impact in network consumption.
i researched google i am not finding the option upon that person statement, is there any option freeware software available to achieve such scenario.?
Waiting on your valuable reply.
Regards
Mohamed
can’t this red5 i use like youtube not livestreaming but like storage and display di video list?
@Irfan,
No, you can’t do uploading and listing the videos. Red5 used for any media, live streaming.
Thanks & Regards,
Babin Lonston
oh tq for information, this red5 cant i use for stream media for onther network link like vsat for entertainment or selling displya ini minimarket.
Hi, Thanks for the tutorial. You can also review Ant Media Server. Ant Media Server Github Page: https://github.com/ant-media/Ant-Media-Server Also review website: https://antmedia.io Best Regards
Thanks for the info. Will try with Ant media server.